Patience. Action. Peace. Believe. Faith. Inspire. Nurture. What is your word for the year? Many of us are familiar with the concept, through Ali Edward’s blog and others, of selecting a word for the year to provide focus, rather then a list of resolutions. Last year my word was Believe – believe I myself, my art, my creativity. With six publications for the year and this exciting adventure with Lavender Sky Studios, I’d say it served me well. What is your word? Take some time to dwell on it. What would you really like to focus on this year? Are you trying to simplify your life? Are you looking for a change? Are you trying to gain focus? Write down a few words, or maybe a whole page worth. What jumps out at you? Now, go get a cup of coffee. I’ll wait. You need a break at this point. Ten or fifteen minutes will do. Just a small break.
Okay, take a sip of that coffee and read your list again. Are you still drawn to the same word? If so, that’s the one! If not, write a few more down. Ali compiled a list of words for 2009 on her blog, if you need a little inspiration. Go get a snack. Come back to your list and repeat the process. Eventually, YOUR word will make itself known. Then, we can begin.
Supply List
Please note that this is just a suggested list. Use what you have on hand. Use what you love. If you purchased a kit from MDW (or received one in my last class – waving to my students out there!!), you will have the basic structure for the book.
Large Tag (mine is 6.25 in. by 3 in.)
Small Tag (mine is 3.25in. by 1.75 in.)
Assorted scrapbook papers (great use for scraps!)
Cardstock piece the size of your large tag
Transparency to fit as pocket for large tag
Assorted grungeboard or chipboard pieces, including a number
2 Ideaology Fragments
1 metal charm
Fibers and/or ribbon
Assorted stickers and rub-ons
Eyelets
Glossy Accents
Paint, ink, or other coloring medium
Optional: stamps, glitter, music/text pages, alcohol ink or permanent markers
Before we begin:
Prepare your inside pages and back cover by using the large tag as a template to trace 4 inside pages from your patterned paper scraps and one back cover from cardstock. Cut out all of the pages and punch a hole in the top, using your tag as a guide.

Step One:
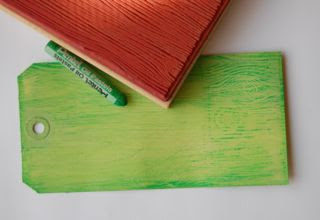
Color your tag with ink, paint, colored pencils, whatever! Here I painted the tag, and while the paint was still wet, pressed a rubber stamp in it for texture. After the paint was dry, I rubbed an oil pastel lightly over the tag to bring out the wood grain texture. Don’t forget to paint the back side, too!

Step Two:
Trim a transparency scrap to fit as a pocket on your large tag. I used a Prima IOD paintables transparency, and used alcohol inks to color it. You can see a video of Josie from IOD demonstrating that technique here.
You could also use permanent markers, or of course, color transparencies. Attach your pocket to the front of your tag with eyelets, staples or brads.

Now it’s time to make the small tag that will sit in the front pocket. As with the large tag, begin by coloring your tag with ink or paint.
Step Three:
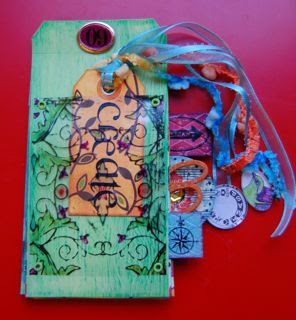
Your word for the year should be the focal point. Use large letter stickers, rub-ons, or write your word on the front. Embellish with stamps or rub-ons.
We’ll be using those clear fragments in your kit to make charms for our tag. If you don’t have fragments, you can use a piece of clear transparency or cover your images with glossy accents.

Step Four:
Select a few images that represent your word. These images don’t need to be literal representations; choose something that is meaningful to you. Smear a small amount of Glossy Accents on the back of the fragment, and press down over your image. When dry, use scissors or a craft knife the cut off the excess.

Step Five:
Thread assorted ribbons and/or fibers through the tag. Glue the charms to ribbon ends. I then covered the backs of each charm with patterned paper to finish them off.
That's it for the cover! Today's lesson was the longest. For the rest of the week, we'll add a page a day to the inside of the book. If you have any questions, leave them in the comments section and I'll answer them there, or you can email me using the link on the right. Yesterday I posted the class kit winners, so check here to see if it was you! Happy Monday, and take a little time today to CREATE:)

This is fantastic! Thanks so much!!
ReplyOoooh, I love this!! Great tutorial, thanks
Reply