Wednesday, December 16, 2009
Tuesday, December 8, 2009
JYC Day 3 and 4
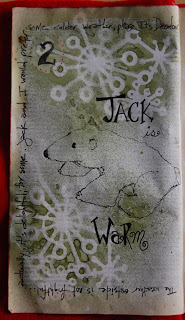
I actually have Day 6 and 7 done, too, but no pictures yet (still working on 5). The envelope for day three has my story of deciding not to send Christmas cards again this year - maybe. I keep waffling on this subject. I actually thought the drawing for Day 4 (shown first here) would make a good card, so maybe. Or not. I suppose I will let Father Time decide for me. I was so glad that today's entry, number seven, was to organize your to-do list. I ran errands today and it was perfect timing. Considering I only had five hours of sleep last night, I really should be off to bed. Am I catching up with the holidays, or are they catching up with me?
Wednesday, December 2, 2009
Day 2
Look at me, two posts in two days! The topic for JYC was the weather, which has been pretty warm around here for this time of year. No jacket needed in the afternoon, which makes me a little sad. Cloudy, cold weather please; it feels more like Christmas that way!
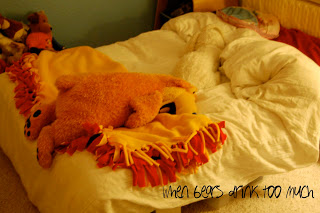
And I found this disturbing site last night in Max's bedroom. Another example of why bear's shouldn't drink.
Tuesday, December 1, 2009
JYC and December Daily, Round Two
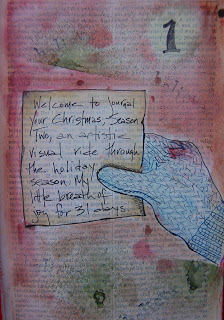
Despite the fact that I am still trying to finish my December Daily album from last year, I am attempting both Journal Your Christmas and December Daily again this year. I used the JYC prompts mostly as an art journal last year, and it was so much fun (I did complete that one!) I have opted for the art journal format again this year. Last year I altered a Little House on the Prairie book (it was a Christmas themed one, so the cover was perfect), but this year I have slightly altered the strata. I have a couple hundred loose vintage book pages left over from another project, so I gessoed those individually, then sewed them into a folded felt cover. Super duper easy, tote-able, and doesn't take up much space on my desk. I also like how I can fold the pages all the way back, unlike a hardcover book. Today's theme is the manifesto. I'd like to think of it more as an invitation. You are cordially invited to view my entries throughout the season. I'd like to say that I will post them daily, but I don't think that could ever be a reality. We'll see. At least, here is day 1.
Wednesday, November 25, 2009
Thankful
Of course I am thankful for my family and all of the people who bring joy to my life, for our health, our employment, and the time we are able to spend together. But today, I reflected on some of the smaller things that I am also thankful for:
fair trade, organic coffee at Trader Joe's
Gluten free bloggers, especially Karina's Kitchen, Elena's Pantry, the Nourishing Gourmet and Gluten Free Girl (you all have brought so much good food to our family!)
.01 and .005 Micron pens
a cabinet full of herbs
fall leaves
cardigan sweaters
flannel sheets
polar fleece socks
sleeping children (fingers crossed on that one!)
coffee (did I mention that already?)
and for all of you that have clicked on this little blog. Happy Thanksgiving!
Wednesday, November 18, 2009
Ummm...Pancakes
Matt was out with the boys and I didn't really feel like cooking, so it was pancake night. Lots and lots of pancakes. Like maybe 40. I had no idea the recipe would make so much, but can you really have too many pancakes?
And.... you may want to check out the March 2010 issue of Somerset Studio. I know it's a few months away, but I'm just sayin'...
Sunday, November 15, 2009
The Egret
The kids were amazingly patient and quiet. They found a good spot to watch him, down by the mint. We observed him for about half an hour, following his progress up the creek. Then our tummies told us it was lunch time. A good morning.
Tuesday, November 10, 2009
Marsh Creek, November
Marsh Creek winds its way along at the end of our street, and it is my favorite source of inspiration and solace. I have taken photos of it every month this year, and for this installment, I played with two of my favorite apps, Camera Bag and Toy Camera. Maybe tomorrow I'll actually take the SLR with me, but the year's documentation has all been taken with my iPhone. Amazing what that thing can do.
The kids are excited about having tomorrow off to play at the creek. I told them of all of the birds I spied today, and the big fish I was able to see because the creek is running so low (rain, please). It's everyone's favorite place to play, even the dog. After finishing Last Child in the Woods the other night, a book every parent in America should read, it has become even more important to me. It's our little slice of wilderness in this suburbia, an experience that is slipping away from our kids. I remember building a tree "house" (really just tree benches, because enclosed structures invite all sorts of nefarious creatures in the Arizona desert) and playing for hours in the wash behind our house as a child. I was about as afar as you could get from being called a tomboy, yet outside play was still the norm for everyone, then. Now video games and simulated play on the TV are. Why, in heaven's name, would you want your preschooler to ride a plastic bike hooked up to the television when they could be actually riding one outside? Come on, get up and go play outside. Just remember to take your coat.
Monday, October 26, 2009
Monday, October 19, 2009
Tuesday, October 13, 2009
At a Crossroad
I am taking a great online course about being an online artist, by the wonderful Marisa Anne of Creative Thursday fame. And while I have struggled to keep on top of the weekly lessons and responses (it started right before we went on vacation, so there was some catch up involved), she has also left me with much to ponder. Recently, Max has had some reactions that I think are due to artificial colors (discovered this on vacation, since we really don't have any foods around here anymore that aren't all natural), so we are trying the Feingold diet as well, and I've been trying to get the kids more motivated about the OT exercises, and thus I've produced very little in the way of art. Most nights, I end up falling asleep with the kids or catching up on Project Runway. It's been a tug of war lately - should I even try to make a go of it right now? The kids need so much, with diets and therapies, that I feel guilty. And overwhelmed. Then the next day I get something done (like two entries sent off to Somerset - yeah for me) and make elaborate plans in my head, that never seem to get realized right now. It's a constant back and forth.
So that's where I stand - exactly nowhere. I feel like Alice. I have gone down the rabbit hole, but no matter which way I walk, I end up back at the mushroom.
Monday, October 5, 2009
We're Back!
We had the best vacation ever this year - six days at Disneyland, one at Legoland! Finding gluten free food at Disneyland that the kids would eat was somewhat of a challenge (new goal - get the kids to eat hamburgers! Our lives would have been so much easier if they would!), and they ended up eating a whole lot of fruit. We all dropped a few pounds! Crazy as it seems, we had the longest stay ever, but I got the fewest drawings done in this year's book! I guess now that they are older, we spent less time napping (okay, no time napping) and bedtime became later and later. I'll have to catch up on it this week. I didn't bring the Nikon, either, only my iPhone for pictures, which worked out really well. All of the shots were uploaded to Shutterfly before we even got home! I also downloaded three Dineyland apps while we were there, which kept the kids busy while we waited in line or for food. The Hidden Mickeys one was a real hit - Max LOVED looking for them! What did I ever do before the iPhone?
Legoland was really great - so mellow, no crowds, lots of play areas, not just rides. It was also gluten free heaven - no special orders, no talking to chefs, they just had GF buns for hotdogs, and cookies, snacks and even cereal in their little snack market! For most people I now this sounds like no big deal, but when you are on a restricted diet, it means everything. I did get sick once from Storyteller's Cafe in the Grand Californian, and Matt accidentally glutened Max with Crunch ice cream bars. They were supposed to get ice cream while Madeline and I went on the Haunted Mansion ride, and when I got off and saw what they were eating, it was like one of those slow motion bits where you're running and waving your arms, "nooooooo." Too late - full rash that night, and lots of carrying him the next two days (he get fatigue from gluten). Overall, though, I'd say we did pretty well.
Now the house is in a state while I decorate for Halloween. I have come to find this year that my regular art work seems very appropriate for Halloween decor. Hmmmm..... I'll post some pics when the place is back in order.
Friday, September 25, 2009
Perfect
Sometimes you find the perfect pair of shoes.
I'll be taking a little blog break for a week or two. Life is a little hectic right now, and the boy often hijacks my laptop for homework:) See you soon!
Wednesday, September 23, 2009
Happy Birthday, Matt!
Daddy got a little help with that cake.
Happy birthday to a great father and the perfect man for me. We love you!
Sunday, September 20, 2009
Halloween on the Brain
A walked dog, a clean car inside and out, one skirt and two pairs of shorts (it should be around 100 degrees Monday!) - I'm feeling very productive today. But, I still have a shirt to finish and bread to bake, so I'll leave you with thoughts of Halloween. Now I just need to figure out what I'm going as this year! Suggestions?
Monday, September 14, 2009
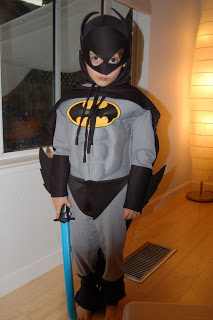
I'm Batman
Max is not much of a "dress-up" kid, so I had to capture this rare moment in his future Halloween costume (the shot looks better when you click on it). That's the Bat Cave he's constructing there - can you tell we're in Batman mode these days?
Sunday, September 13, 2009
Simple Kids Showcase
Just wanted to mention that the fabric tag chart was selected for the Simple Kids Showcase. Megan also has a list of links to some fabulous blogs. Check it out!
Thursday, September 10, 2009
Tuesday, September 1, 2009
Moss Beach Album


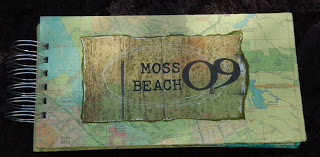
I've had these painted map pages laying around for quite awhile, possibly for a future class, but since MDW has closed, I thought I'd use them. The cover is a combination of tissue and map pages, the insides are gessoed map pages with machine stitching. Simple, but perfect for a mini album. I was inspired by a post on the Scrap For A Cure forum, where they asked you to list the five things you couldn't scrap without. I had cardstock, patterned paper, paint, ink, and sewing. Okay, I cheated here a little with the sticker on the inside page, but just a little:)
(well, I guess the scheduling didn't work on this one. I'm too lazy to re-do it, so we'll just leave it here until the next post...)
Monday, August 31, 2009
Lisa Leonard giveaway at Simple Mom
Just sayin' that Simple Mom, one of my very favorite blogs, is giving away three Lisa Leonard gift certificates. If you have never seen her work, check it out. Her jewelry is awesome! Go leave a comment at Simple Mom, right now!
Sunday, August 30, 2009
Fabric Tag Chart Tutorial
Finally have my computer back for a few hours. This sharing thing takes some getting used to! And, in the spirit of sharing, I have a tutorial for you today. I had purchased a fat quarter bundle from Fresh Squeezed Fabrics (just saw she had some new fabrics that look pretty tasty...) without any particular projects in mind. This one seemed perfect for a fat quarter, but any size fabric would do.
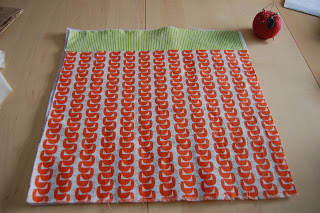
Step One: Cut material to desired size. I used a fat quarter for the body, and a striped remnant for the topper (stitched together). For this wall hanging, I cut a piece of old acrylic blanket as a filler, and muslin for the backing. You could also use quilt batting, or fuse an interfacing to the wrong side of the front fabric.
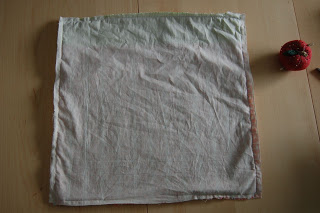
Step two: Place right sides together and sew around the edges, leaving a space for turning. Since I was using the blanket batting, made that the bottom layer, so it would end up as the middle layer when turned.
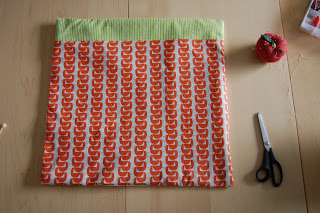
Step Three: Turn right side out, press and sew seam closed.
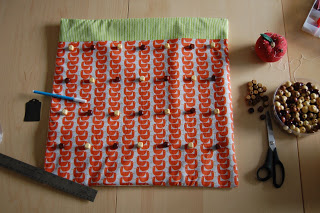
Step Four: Decide on what to use for "hooks" to hang your tags. I chose large beads, figuring they would be easy for little hands to slip tags over. If I were to o this project again, I would use my original idea, buttons. The buttons have a greater area around the point of attachment with which to support the string for the tag. Since my beads are sewn side to side, the tag kind of drapes around it and has a tendency to fall off more easily. Attaching the bead through the center with a french knot (more like sewing on a button) would also be a better choice. Oh well, live and learn.
I measured out the spacing for the beads (this would depend on the size of your chart and the size of tags you are going to hang from it) and marked it with a water soluble fabric pen. Finally, I stitched on the beads.
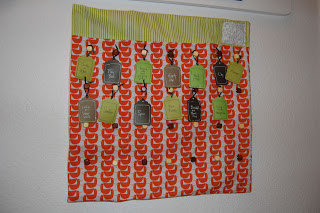
Step Five: Using scraps of scrapbook paper, I punched out tags and labeled them with activities my kids can do when they are board to earn extra Disney dollars. Of course you could also use pre-made tags, but this was a great way to use some of my paper stash.I also added a pocket at the top to hold the tags we remove when we use it as a vacation count down chart (see this post). It could be a calendar, chore chart, reward chart... whatever you (or your kids) can come up with!

Step One: Cut material to desired size. I used a fat quarter for the body, and a striped remnant for the topper (stitched together). For this wall hanging, I cut a piece of old acrylic blanket as a filler, and muslin for the backing. You could also use quilt batting, or fuse an interfacing to the wrong side of the front fabric.

Step two: Place right sides together and sew around the edges, leaving a space for turning. Since I was using the blanket batting, made that the bottom layer, so it would end up as the middle layer when turned.

Step Three: Turn right side out, press and sew seam closed.

Step Four: Decide on what to use for "hooks" to hang your tags. I chose large beads, figuring they would be easy for little hands to slip tags over. If I were to o this project again, I would use my original idea, buttons. The buttons have a greater area around the point of attachment with which to support the string for the tag. Since my beads are sewn side to side, the tag kind of drapes around it and has a tendency to fall off more easily. Attaching the bead through the center with a french knot (more like sewing on a button) would also be a better choice. Oh well, live and learn.
I measured out the spacing for the beads (this would depend on the size of your chart and the size of tags you are going to hang from it) and marked it with a water soluble fabric pen. Finally, I stitched on the beads.

Step Five: Using scraps of scrapbook paper, I punched out tags and labeled them with activities my kids can do when they are board to earn extra Disney dollars. Of course you could also use pre-made tags, but this was a great way to use some of my paper stash.I also added a pocket at the top to hold the tags we remove when we use it as a vacation count down chart (see this post). It could be a calendar, chore chart, reward chart... whatever you (or your kids) can come up with!
Wednesday, August 26, 2009
Highjacked
Matt had my laptop all last night for his engineering homework , so I couldn't post the tutorial. I'll try to get on this afternoon before he comes home.
Sunday, August 23, 2009
The kids get ready

While the Disney trip is still a long way off, the kids' excitement level is in high gear. They put their stamp on the tag chart project (tutorial for the fabric chart on Wednesday) with a little art project. I gave them a scrap paper file and a large tag punch, and had them punch out 30 tags. Not only was it a great motor activity, but it gave me a good thirty minutes of interruption free kitchen time! Then i brought out the markers, ink and stamps, and let them go to town. Polka dots were a definite favorite! Next, a numbering from one to thirty. A few ribbon ties and we have count down tags for the big vacation. Or punch some orange and black ones and we can count down to Halloween. A versatile project!
Monday, August 17, 2009
Back to the pencil
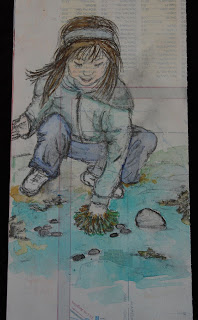
This Saturday I was finally able to spend some quality time at my desk, to play with my pencils and watercolors. I even managed to do a few daily drawings last week. Okay, they are not exactly daily anymore, but I keep the title with great hope. As much as I love my paints, inks, and assorted ephemera, I have to say that the simple drawing is still my greatest love. Pencil, pen, paper - that's all I really need to be happy. So here's to hoping that Max's cough clears up today, so he can finally get those abscessed teeth out and actually go to kindergarten, and we can all get our routine back. A routine that includes good health and daily drawing.
Friday, August 7, 2009
A Little Break
It has been awhile, hasn't it? Well, as Max prepares to get two teeth extracted (he has not one, but two abscesses)and I finally get to downloading all of our recent photos, I'll let you know about a great Green blog, and a fabulous giveaway they are having. The Alternative Consumer highlights some wonderful Green companies, and this week they are giving away clothing from Indigenous Designs (beautiful, classic clothes, by the way). Click here to enter the giveaway, and stay tuned for more frequent posts!
Friday, July 24, 2009
Simple Kids Showcase
I am thrilled to report that our nature journals were the Showcase this week on one of my favorite blogs, Simple Kids. You can see the post here.
Tuesday, July 21, 2009
Car Seat Protector Tutorial
Remember that post about the slower pace of summer? Well, I'm afraid that will be ending in a few precious days, as I have to return to work on Friday and the kids start back on Tuesday. Since we will be spending more time in the car now, I thought I'd make some new back seat protectors. (If you have kids that never kick the back of your chair or put their feet on the back of the seat, you can skip this post. But, if your kids are like mine, then the backs of the driver and passenger seats seam to have a permanent "kick me' sign attached.)
I had one awful vinyl cover still hanging on behind the passenger seat. The other had torn apart last year, and this last one was in bad shape as well. Besides, it was made of horrible plastic, and I thought fabric would be ever so much better. Since I needed a material that would hold up to many bouts with tennis shoes, I chose a towel for the main portion, and some cute Ikea fabric to add a little style up top. I already had the fabric, and the towel was $5 at Target, which was enough for both seats. So this project cost me a grand total of five bucks! For two seat protectors for my Honda CRV, I used one bath towel about a half a yard of cotton fabric (although I didn't measure), ribbon and thread. That's it! Here we go:

Step One:
Cut 4 pieces of cotton fabric to serve as the top of your protector. This will basically match the top portion of the back of the driver's or passenger's seat.(I used the old protector as a pattern guide, but you could also just go trace/measure your seats.)

Attach ribbon (or shoe laces) to the tops of TWO of your pieces, pinning it in place. These ribbons will tie your protector to the headrest of the seat to secure it.

Put a second piece ove the first, right sides together. Sew a quarter inch seam around the top and sides, LEAVING THE BOTTOM OPEN.

Turn right side out and press. Turn the bottom under a half an inch all the way around and press.

Cut the bath towel in half horizontally. Take one piece and trim the side to match the width of the topper. You could be good and sew a matching bias tape along this cut side, or you could be lazy like me and zigzag stitch the cut edge. Slip the towel into the bottom opening of the topper and topstitch across (make sure you use the finished edge of the towel as the bottom!)

There you have it! Tie the ribbons to the back of your headrest and let the kids kick away! When it gets dirty, you can just throw it in the wash!
Update:
The seat protectors are still going strong, but the ribbons kept coming untied. I removed the ribbons and added twill tape loops, which fit around the head rest poles (remove your headrest, slip loops over the holes, and replace headrest). Problem solved. When I make them again (once the fabric is deemed "too baby", which I'm sure will come) I will add stabilizer to the top fabric, to give it more body. Otherwise, they do their job and still look good!
Note: I tuck the bottoms of the protectors into the seat pocket so it is still a usable storage area.
I had one awful vinyl cover still hanging on behind the passenger seat. The other had torn apart last year, and this last one was in bad shape as well. Besides, it was made of horrible plastic, and I thought fabric would be ever so much better. Since I needed a material that would hold up to many bouts with tennis shoes, I chose a towel for the main portion, and some cute Ikea fabric to add a little style up top. I already had the fabric, and the towel was $5 at Target, which was enough for both seats. So this project cost me a grand total of five bucks! For two seat protectors for my Honda CRV, I used one bath towel about a half a yard of cotton fabric (although I didn't measure), ribbon and thread. That's it! Here we go:

Step One:
Cut 4 pieces of cotton fabric to serve as the top of your protector. This will basically match the top portion of the back of the driver's or passenger's seat.(I used the old protector as a pattern guide, but you could also just go trace/measure your seats.)

Attach ribbon (or shoe laces) to the tops of TWO of your pieces, pinning it in place. These ribbons will tie your protector to the headrest of the seat to secure it.

Put a second piece ove the first, right sides together. Sew a quarter inch seam around the top and sides, LEAVING THE BOTTOM OPEN.

Turn right side out and press. Turn the bottom under a half an inch all the way around and press.

Cut the bath towel in half horizontally. Take one piece and trim the side to match the width of the topper. You could be good and sew a matching bias tape along this cut side, or you could be lazy like me and zigzag stitch the cut edge. Slip the towel into the bottom opening of the topper and topstitch across (make sure you use the finished edge of the towel as the bottom!)

There you have it! Tie the ribbons to the back of your headrest and let the kids kick away! When it gets dirty, you can just throw it in the wash!
Update:
The seat protectors are still going strong, but the ribbons kept coming untied. I removed the ribbons and added twill tape loops, which fit around the head rest poles (remove your headrest, slip loops over the holes, and replace headrest). Problem solved. When I make them again (once the fabric is deemed "too baby", which I'm sure will come) I will add stabilizer to the top fabric, to give it more body. Otherwise, they do their job and still look good!
Note: I tuck the bottoms of the protectors into the seat pocket so it is still a usable storage area.
Subscribe to:
Posts (Atom)

