This is my daughter's favorite type of nightgown, and lucky for me, it's quick to make! It's also a great scrap buster and a fast repurposing of an old t-shirt. What more could you ask for?
After selecting a t-shirt to use (looser fitting tees work better, as you will come to find out in this tutorial), choose coordinating fabrics for the bottom, or even another t-shirt. Madeline selected all of the shirts and fabrics for her nightgowns. You can use one large bottom piece or combine prints, as we do here.
Measure your trim fabrics and sew the pieces together, if using two. Be sure to press the seam open. Since this is a nightgown, and she just HAD to have them right away, I used a lot of cheats. Instead of taking proper measurements, I just held the folded piece of fabric against the hem of the t-shirt and added a bit for the seam.
Another cheat here - instead of measuring and sewing the bottom piece into a tube, I pinned the right side of the bottom fabric to the right side of the t-shirt hem, inserting a pin exactly where the two open ends should come together to form a seam.
I unpinned the piece around the seam, pulled the t-shirt fabric back, and sewed a seam.
I pinned the t-shirt back around the seam and made a seam around the entire bottom of the gown, where the two pieces attach.
I pressed open the seams and added a hem. I zigzag my seams to finish them, but if you have a serger you could do that as well. I would, at the very least, pink them, since nightgowns get washed frequently.
This was our final product, but because the t-shirt is quite fitted, it was too tight for comfortable night ware. Lesson learned - loose t-shirts are better! A refitting was in order.
I cut the bottom part of an old t-shirt that I recently hand dyed, and then cut off the original gray t-shirt a few inches below the waist. I seamed these two pieces together to add ease ( and both are jersey, so no need to finish the seams!), then added the patterned bottom to the new blue panel.
Now the nightgown was loose enough for comfortable movement.
This t-shirt had more ease, so I simply added a slit to the bottom fabric for easier movement. If you use an old t-shirt or two for the bottom layers, as we have also done in the past, you should have enough stretch to skip a slit. With old tees this project takes about a half an hour, with fabric strips about an hour for the first one. A quick and frugal refashion!
Showing posts with label nightgown. Show all posts
Showing posts with label nightgown. Show all posts
Monday, July 9, 2012
Monday, June 21, 2010
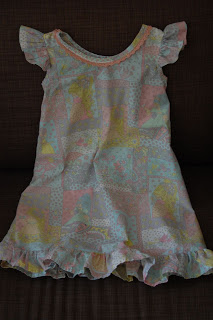
70's Flashback Nightgown
I had ordered this Patch Blue Storybook fabric from Sew Mama Sew in January, without any plan for using it. I just loved the retro 70's look. It reminded me of sheets I had when I was a kid. Madeline saw the fabric recently and said we should have matching nightgowns. Well, I'm not so keen on nightgowns, but I made one for her. It is a quilting weight cotton, so it doesn't drape as nicely as a lighter fabric, but it still looks darn cute on her. It's Butterick 6659, with a little alteration in the length. As for the matching part, I had to order another couple yards for me, but I think I'll be making some sleep shorts for myself.
I made a quick pair of shorts for Max from an old men's knit shirt, and cut out a shorts and top set for Madeline last night. I really should pick up my sketchbook today; it's been neglected for far too long. It is the Solstice though, so I think banana ice cream pops and playing in the sunshine would be a better plan for today. What's on your sewing/craft table?
I made a quick pair of shorts for Max from an old men's knit shirt, and cut out a shorts and top set for Madeline last night. I really should pick up my sketchbook today; it's been neglected for far too long. It is the Solstice though, so I think banana ice cream pops and playing in the sunshine would be a better plan for today. What's on your sewing/craft table?
Subscribe to:
Posts (Atom)


