Wednesday, July 11, 2012

DIY BooBoo Ice Pack Cover


Whenever anyone gets hurt, no matter what the injury, the first thing my kids run for is an ice pack. Over time, we've lost one and the cover on the other had seen better days. I figured there had to be a way to make your own, and after a quick Goggle search, I found this recipe.

I used the one with rubbing alcohol, and since I had wintergreen, I didn't need to add food coloring (you don't want anyone to mistake it for plain ice!) It works like a charm!
I took a rough measurement by laying some fleece for a warmer side and PUL fabric (which is waterproof, so the sweat from the ice won't go though the fabric) for the cool side, over the ice pack. Quick and dirty folks, since it is going to be draped over cuts and scrapes! You could use cotton for this as well, but the ice will moisten it after a few minutes.
I pinned the fabrics right side together, on three sides, to make a pocket. I didn't even bother trimming the fleece until after I seamed them together.
Trim the seams and cut the corners close to the stitching. Turn right side out.
Pin the open edges under and topstitch closed. Normally, I wouldn't pin PUL to limit the amount of punctures in it, but the ice pack fits below this area.
I added a plastic snap to keep the ice pack in. You could use a sew on snap, button, or velcro as well. I just have an abnormal attachment to my diaper snap setter (and it's fast! You know I love fast).
That's it! I made two, just in case of double injuries:)

Monday, July 9, 2012

Quick T-shirt Nightgown Tutorial

This is my daughter's favorite type of nightgown, and lucky for me, it's quick to make! It's also a great scrap buster and a fast repurposing of an old t-shirt. What more could you ask for?

After selecting a t-shirt to use (looser fitting tees work better, as you will come to find out in this tutorial), choose coordinating fabrics for the bottom, or even another t-shirt. Madeline selected all of the shirts and fabrics for her nightgowns. You can use one large bottom piece or combine prints, as we do here.

Measure your trim fabrics and sew the pieces together, if using two. Be sure to press the seam open. Since this is a nightgown, and she just HAD to have them right away, I used a lot of cheats. Instead of taking proper measurements, I just held the folded piece of fabric against the hem of the t-shirt and added a bit for the seam.

Another cheat here - instead of measuring and sewing the bottom piece into a tube, I pinned the right side of the bottom fabric to the right side of the t-shirt hem, inserting a pin exactly where the two open ends should come together to form a seam.
I unpinned the piece around the seam, pulled the t-shirt fabric back, and sewed a seam.
I pinned the t-shirt back around the seam and made a seam around the entire bottom of the gown, where the two pieces attach.
I pressed open the seams and added a hem. I zigzag my seams to finish them, but if you have a serger you could do that as well. I would, at the very least, pink them, since nightgowns get washed frequently.
This was our final product, but because the t-shirt is quite fitted, it was too tight for comfortable night ware. Lesson learned - loose t-shirts are better! A refitting was in order.
I cut the bottom part of an old t-shirt that I recently hand dyed, and then cut off the original gray t-shirt a few inches below the waist. I seamed these two pieces together to add ease ( and both are jersey, so no need to finish the seams!), then added the patterned bottom to the new blue panel.
Now the nightgown was loose enough for comfortable movement.
This t-shirt had more ease, so I simply added a slit to the bottom fabric for easier movement. If you use an old t-shirt or two for the bottom layers, as we have also done in the past, you should have enough stretch to skip a slit. With old tees this project takes about a half an hour, with fabric strips about an hour for the first one. A quick and frugal refashion!

Thursday, July 5, 2012

Baby Bits

Quiet around here, I know. The combination of pregnancy and my computer crashing didn't help much. I lost a few tutorials, but fortunately I had a fairly recent back-up so once it was fixed, I was able to recover most of my pictures. Lesson learned - keep the back up drive plugged in!

We are still waiting for the little one's arrival, but I thought I would post a few snapshots of some of my little baby projects.

The changing station. I had a changing table for the first two, but this time we saved space with a dresser top changing pad. I've always had a mobile on the table for distracting squiggly babies, but since I had no sides to clip one to and vaulted ceilings, I needed to come up with a different solution.
We added a small shelf to the wall to hold newborn essentials out of reach, so I simply sewed a piece of one inch elastic together to slip around the shelf, ad sewed three twill tape pieces to the bottom. I added snaps to hold pictures or soft creatures (the ones pictured here were cut from a cute Ikea print and stuffed), that can be easily changed out as he gets older or becomes bored with them.

I sewed about a dozen fitted diapers to start us off with (I also have prefolds), using the Rita's Rump pattern. It is super easy, and if they fit well, I think I will sew a dozen more as pocket diapers using PUL on the outside and adding snaps (these will need a cover as they are not leakproof). I just love all of the cute flannel prints!

For me, a glider is just as essential as diapers. We got rid of ours after the kids got older, but my mother found this one on Craigslist for a great price. The chair cushions came out of the wash looking fine, but the footstool was stained. I recovered it using an Ikea canvas curtain panel found at Goodwill for $5. I didn't have enough material to recover the cushions, so I decided on a racing stripe, instead. It was a little tricky maneuvering the cover under the machine, and I did realize that I had reversed the striped piece on the bottom cushion, but that's what you get for sewing at 11 pm when you're pregnant. I can live with it, and eventually I will recover the entire chair (the cushions look beige in this picture, but are actually more of a yellow cover and don't quite go with the rest of the room).
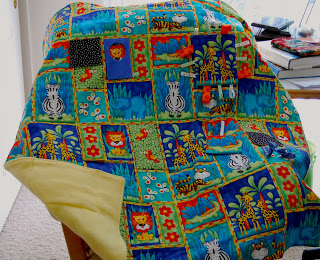
Last but not least, the activity blanket. The top panel was from a dear friend, who hung it above her own daughter's crib. At first I thought of making it into a quilt, but the bright colors and playful pattern just screamed fun, so it became an activity mat. I cut about 8 inches off of the bottom to use as pieces for the rest of the blanket. The inside has a layer of cotton batting and it is backed with a yellow fleece for comfort, and to keep it from sliding on the floor.
This panel was backed with fleece and edged with ribbon tags, since we all know that babies love the tags best.
The alligator piece is attached with elastic to pull on, and the butterflies are covered with a knit fabric to finger. The dotted panel above opens to reveal a parrot.
There is a second flip panel on the top left, and a peek-a-boo fleece door over the lion. The flowers on the bottom left are actually a strip filled with celophane so they crinkle when you grasp them.

Now I'm just trying to convince the little bean to come so he can enjoy his goodies!