Friday, February 27, 2009

Daily Drawings


It's been awhile since I posted some daily drawings. Here are just a few. While they are not always daily, when I was scanning them in tonight, I realized that they were pretty close. And that I need to buy a new sketchbook. I have missed a few days lately, but I've had terribly stuffed up sinuses lately, and it's been so hard t concentrate. I hate that feeling, when you're walking in a fog. I always have a list going in my head of a million things to do, projects to work on, drawings to do, and I hate when I'm forced into idle time. Thank goodness the stacks of drawings of medicine bottles and thermometers seems to be over.

Tuesday, February 24, 2009

Need a Trap?


She can make you one to order. Monsters under the bed? Boogie man in the closet? Pesky little brother? No problem. Call anytime.

Tuesday, February 17, 2009

Not A Little Kid Anymore


My precious Madeline turned seven today. It is hard to believe that seven years could go by so fast. Seven. I can't even call her a little kid anymore; she has reached plain "kid" status. Happy birthday sweetheart, we love you!

Wednesday, February 11, 2009

Sweater Surgery

Matt gave me the book, Sweater Surgery, for Christmas, and I finally worked up the courage this weekend to pull out the scissors and cut one up! I had visions of the sweater unraveling as soon as I made the first slice, and all being lost since I don't know how to knit. (I would love to learn though. Hint. Anyone? Anyone?) To my surprise, not only did the sweater stay together, it turned out to be very easy "material" to work with. My first project is still in progress - a formerly navy quarter zip sweater of Matt's from Land's End has now become a short sleeved cut away cardigan. I haven't quite found the perfect fastener for the front yet, and I'm thinking of felting a design on the back. My second creation was this one:

It is simply the sleeves of an old turtleneck sewn into the green sweater.As it was, the green sweater was nice, but a little too conservative for me. Now that it has a little rock 'n roll, I love it!

This purse was once a skirt! I loved the tube skirt, but after having two kids, it was just wrong to wear it anymore. It took maybe twenty minutes to make, since the skirt was lined. I cut off the bottom, added a pocket inside, sewed it up and used the extra for the strap. The closure is from an old necklace.

So now I am officially obsessed with altering clothing. All of these pieces came out of my give away bag, and there are still more in the works. It is so much fun to combine different garments to make new ones, and so much quicker than sewing from a pattern! Grab an old sweater and give it a try!

Friday, February 6, 2009

Word for the Year Class - Day Five

The final day! Remember to check here to see if you won a class kit! The links to all of the lessons will be added to the list on the right, so you can make your booklet anytime!

For the last page:
Page Four Topic:
Another sentence starter’ “By the end of 2009 I hope to feel _____________”

How I made my page:
Basic Grey “Cupcake” line, with red inked edges. Since this is not a double sided paper, I stamped the back with a pattern so it would look finished when the pages were flipped. I hand wrote my text on a variety of Fontwerks stickers.

The Tab:
I colored a rectangular piece of Grungeboard with red ink, and edged it with blue oil pastel. The rub-on arrow is from 7Gypsies.

For the back cover, you can use another large tag if you have one, or make your own from cardstock, as I did here.

The Back Cover:

Step One:

Glue torn strips of sheet music to the top and bottom of tag. Using Glossy Accents, Write your word in the center. Let dry COMPLETELY (I left mine over night).


Step Two:

Paint the tag with acrylics, and wipe some away with a damp paper towel or baby wipe.

Lightly rub the edges and word with an oil pastel, and blend with your finger or a paper towel. You could also use a crayon for a slightly different effect.

Rub a little Stickles or glitter glue over the sheet music for shine.

Assembling the book:

You can attach your pages using a large brad or eyelet, but if you have the MDW kit, you may want to try your hand at making a custom closure. You’ll need the small metal “frame” that was in the kit, alcohol ink, and number stickers or rub-ons.

Color the inside of the frame with alcohol ink (I just put a drop in the center). Add the year with rub-ons or stickers. Fill the center with Glossy Accents and let dry. When frame is dry, attach to the head of a large brad with a glue dot. Thread through the top hole of the tags and secure.


Your book is now complete! Keep it on your desk, scrap space, or wherever you’ll see it on a regular basis. Remember, your word is your focus for your year, so keep it in a prominent place!

I hope you enjoyed this little mini-class. Please feel free to leave a comment or suggestion for improvement. I am planning on running more online classes, through my blog and other sites, and your comments would be helpful. Thanks so much for playing along this week, and go CREATE!

Thursday, February 5, 2009

Word for the Year Class - Day Four

Time for page three. If the interior papers you are using are not double sided, you might want to consider inking or stamping the blank side to add interest to the back of the page.


Page Three Topic:
What roadblocks are in your path? What might hinder your progress towards your word this year? List them here! Once you’ve identified them, you’ll be better prepared to handle them when they appear, or prevent them altogether.

How I made my page:
Another Cosmo Cricket “Hello Sunshine” paper, edged in blue ink. I used letter stickers for the title, and then wrote my roadblocks directly on the page.

Page Three Tab:

Step One:

Use Glossy Accents or gel medium to adhere old sheet music scrap to textured Grungeboard. Rub the paper a bit, so the texture of the grungeboard shows. Trim around the edge.


Step Two:

Use an ink applicator to apply ink lightly to Grungeboard, highlighting the texture pattern. Add additional ink to edges. Apply a sticker or rub-on to the center, and maybe a little “bling”, too!

Tomorrow we'll make the last page and add a fun technique to the back cover!

Wednesday, February 4, 2009

Word for the Year Class - Day Three

This was my favorite page to make. I was surprised at how the words seemed to flow perfectly, even though this was all free association. The key to this one is to quickly write down the words that come to mind - no pondering, no editing, just list!


Page Two Topic:
Choose a chipboard or Grungeboard number greater than two. Now, write down the first 8 (or whatever number you chose) words that come to mind when you hear your word for the year. This is a free association exercise, but you may be surprised at the insight you gain from it. Put these words on page two.

How I made my page:
The background is from Paper Trunk’s 1974 collection, edged with orange ink. I typed out my words on the computer and glued the strips on the page (I did ink the edges in black, first).

The Tab:
I colored the Grungeboard number with orange ink, then went over that with an orange glitter gel pen to give it a little sparkle.

Remember to check here to see if you won one of the class kits. The kits were from My Daughter's Wish, and each is slightly different - you may get a different number, or different grungeboard shapes, but all of the essential elements for the book are in there. For my blog winners, I'm also adding the paper for the pages. Again, each kit is slightly different, so some of the patterned paper may not be the same as the ones I used here. At the end of the week, I'll post a permanent link on the right side of the page to all of the lessons, so you can construct the book at your convenience.

Tuesday, February 3, 2009

Word for the Year Class - Day Two

Today we’ll start on the inside pages. There is a topic for each page, and instructions for making a tab. How you design your page is up to you. You could use journaling spots, scraps of lined paper, text strips, stickers, or simply write directly on the paper. These are BRIEF compositions (it is a tag book, after all). However, you could use the same topics in your journal/art journal if you'd like to expand on them.


Page One Topic:
Here’s your sentence starter, “I picked (your word)___ for 2009 because__________________.”

How I made my page:
I used a Cosmo Cricket “Hello Sunshine” paper for the page, and edged it with turquoise ink. The journal spot is a swatch of binder paper edged in the same ink.

The Tab:
Ink a small square of Grungeboard and edge it with an oil pastel (I used red for contrast). I chose a compass rub-on by 7Gypsies as my image, to indicate the “direction” I want to go in this year!

That's it! Tomorrow we'll be assembling page two. If you have any questions/comments, you can post them here or email me using the link on the right. Have fun!

Monday, February 2, 2009

Word for the Year Class - Day One


Patience. Action. Peace. Believe. Faith. Inspire. Nurture. What is your word for the year? Many of us are familiar with the concept, through Ali Edward’s blog and others, of selecting a word for the year to provide focus, rather then a list of resolutions. Last year my word was Believe – believe I myself, my art, my creativity. With six publications for the year and this exciting adventure with Lavender Sky Studios, I’d say it served me well. What is your word? Take some time to dwell on it. What would you really like to focus on this year? Are you trying to simplify your life? Are you looking for a change? Are you trying to gain focus? Write down a few words, or maybe a whole page worth. What jumps out at you? Now, go get a cup of coffee. I’ll wait. You need a break at this point. Ten or fifteen minutes will do. Just a small break.

Okay, take a sip of that coffee and read your list again. Are you still drawn to the same word? If so, that’s the one! If not, write a few more down. Ali compiled a list of words for 2009 on her blog, if you need a little inspiration. Go get a snack. Come back to your list and repeat the process. Eventually, YOUR word will make itself known. Then, we can begin.

Supply List
Please note that this is just a suggested list. Use what you have on hand. Use what you love. If you purchased a kit from MDW (or received one in my last class – waving to my students out there!!), you will have the basic structure for the book.

Large Tag (mine is 6.25 in. by 3 in.)
Small Tag (mine is 3.25in. by 1.75 in.)
Assorted scrapbook papers (great use for scraps!)
Cardstock piece the size of your large tag
Transparency to fit as pocket for large tag
Assorted grungeboard or chipboard pieces, including a number
2 Ideaology Fragments
1 metal charm
Fibers and/or ribbon
Assorted stickers and rub-ons
Eyelets
Glossy Accents
Paint, ink, or other coloring medium
Optional: stamps, glitter, music/text pages, alcohol ink or permanent markers


Before we begin:
Prepare your inside pages and back cover by using the large tag as a template to trace 4 inside pages from your patterned paper scraps and one back cover from cardstock. Cut out all of the pages and punch a hole in the top, using your tag as a guide.
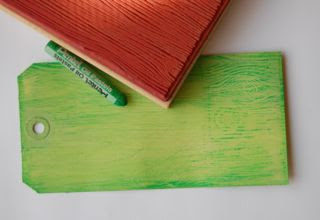
Step One:
Color your tag with ink, paint, colored pencils, whatever! Here I painted the tag, and while the paint was still wet, pressed a rubber stamp in it for texture. After the paint was dry, I rubbed an oil pastel lightly over the tag to bring out the wood grain texture. Don’t forget to paint the back side, too!
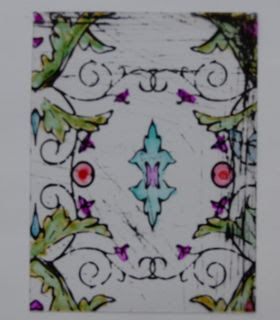


Step Two:
Trim a transparency scrap to fit as a pocket on your large tag. I used a Prima IOD paintables transparency, and used alcohol inks to color it. You can see a video of Josie from IOD demonstrating that technique here.

You could also use permanent markers, or of course, color transparencies. Attach your pocket to the front of your tag with eyelets, staples or brads.


Now it’s time to make the small tag that will sit in the front pocket. As with the large tag, begin by coloring your tag with ink or paint.
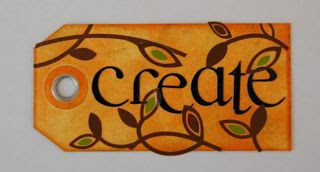
Step Three:
Your word for the year should be the focal point. Use large letter stickers, rub-ons, or write your word on the front. Embellish with stamps or rub-ons.
We’ll be using those clear fragments in your kit to make charms for our tag. If you don’t have fragments, you can use a piece of clear transparency or cover your images with glossy accents.


Step Four:
Select a few images that represent your word. These images don’t need to be literal representations; choose something that is meaningful to you. Smear a small amount of Glossy Accents on the back of the fragment, and press down over your image. When dry, use scissors or a craft knife the cut off the excess.


Step Five:
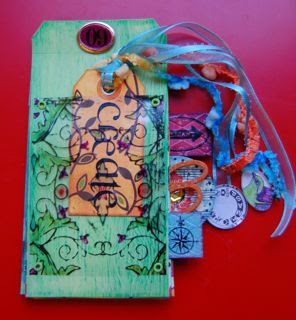
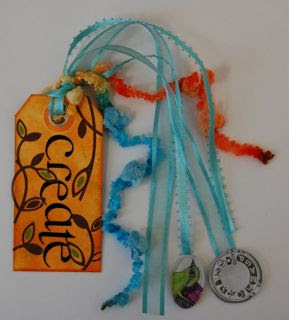
Thread assorted ribbons and/or fibers through the tag. Glue the charms to ribbon ends. I then covered the backs of each charm with patterned paper to finish them off.

That's it for the cover! Today's lesson was the longest. For the rest of the week, we'll add a page a day to the inside of the book. If you have any questions, leave them in the comments section and I'll answer them there, or you can email me using the link on the right. Yesterday I posted the class kit winners, so check here to see if it was you! Happy Monday, and take a little time today to CREATE:)

Sunday, February 1, 2009

And the Winners Are...

Congratulations to:
Lori W
Wabbit
gleeful
miscellanea
Jodi
Jessica (jessicamae3)
and Sharon F
The random number generator picked you for the class kits! Please email me your address (use the link on the right side or send it to liveyourart at mac.com) so I can get your kits out to you! I honestly wish I had 25 to send out, but remember, just use what you have! I hope you also get a chance to read all if the words for the year people left - it is truly inspiring! Check back tomorrow for the first lesson:)

Class Starts Tomorrow!

The first post for the Word For the Year class will be up tomorrow around 9:30 am PST. There's still time to add a comment here to win a free class kit! Comments will close at 7pm PST, and I'll post the winners shortly after.