Showing posts with label education. Show all posts

Friday, April 8, 2016

Playing with Poetry


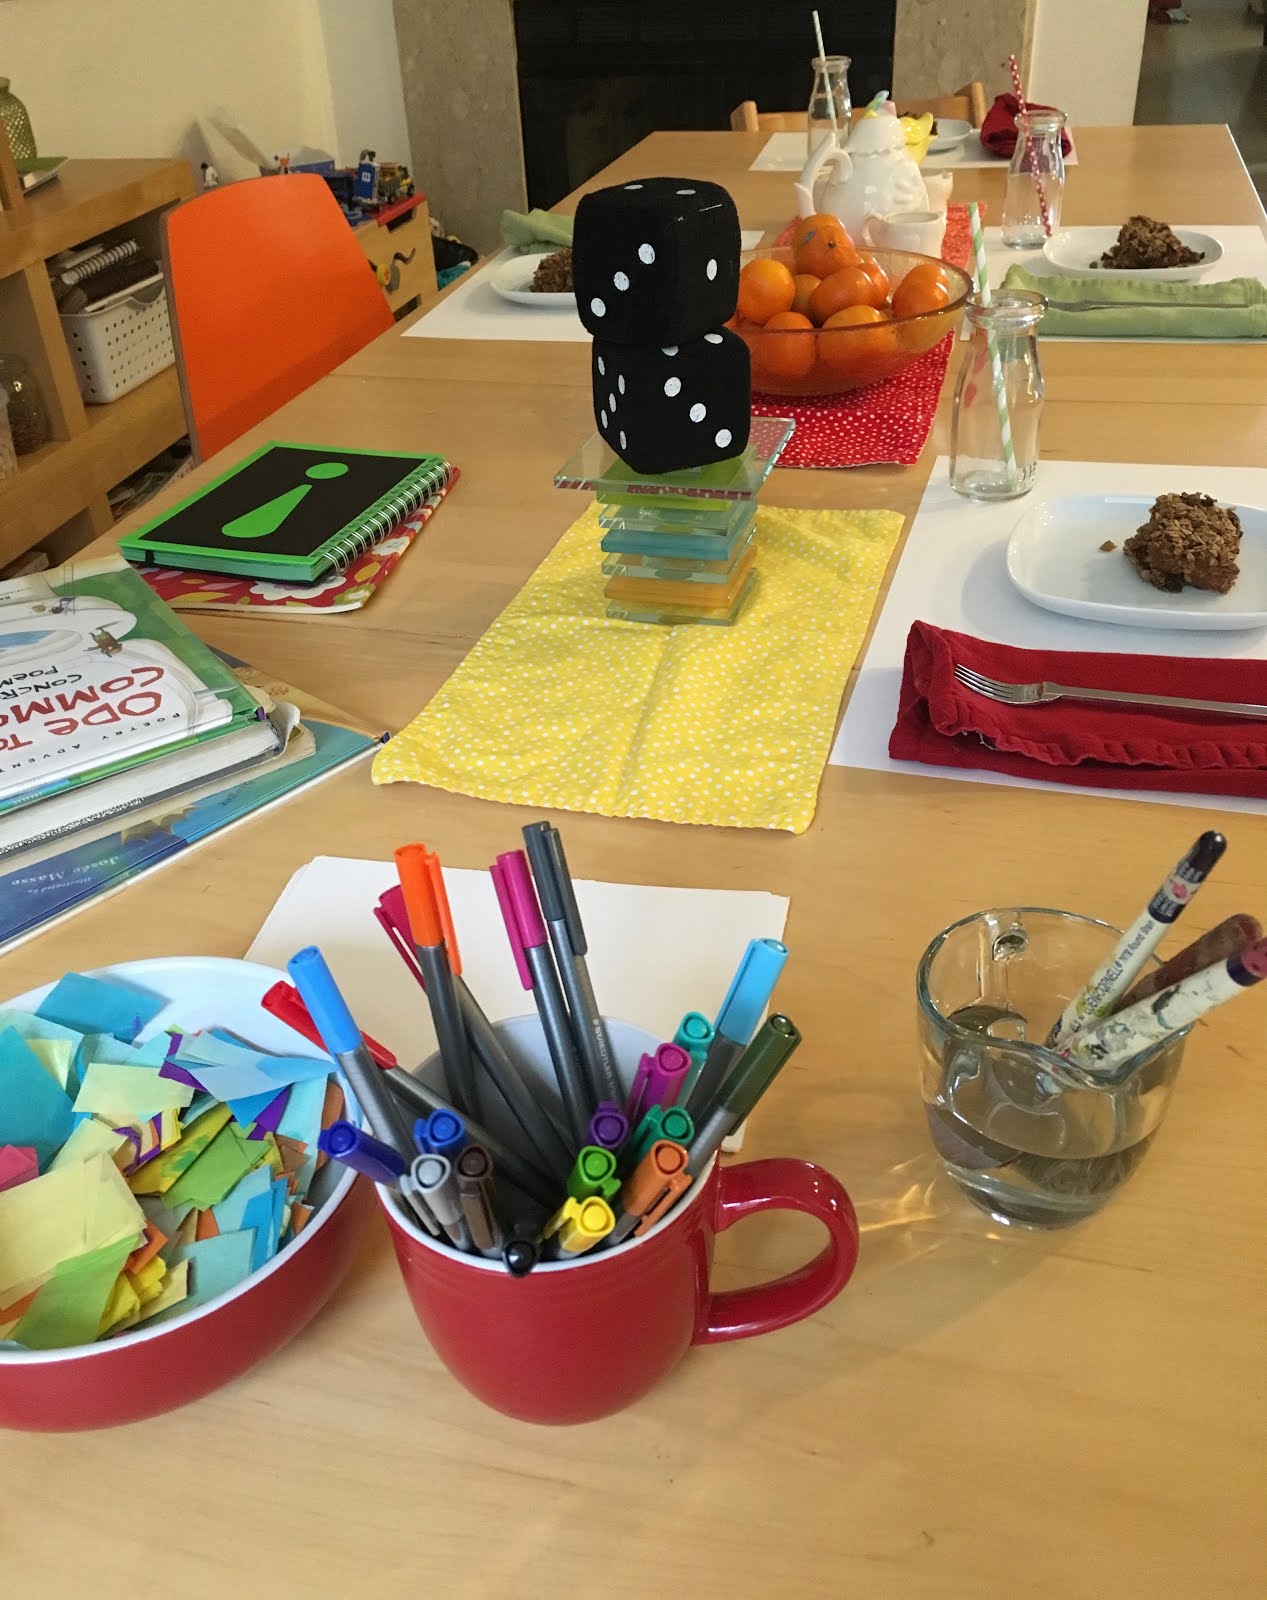
It was a mad tea party for breakfast today! It is our last week of an amazing poetry class from Brave Writer, and one of the lessons involved alternative forms of poetry. I devised two new forms to play with this morning, as it can be a little hard to inspire the desire to work on writing when it's 8o degrees outside. Baked oatmeal with chocolate chips doesn't hurt, either.

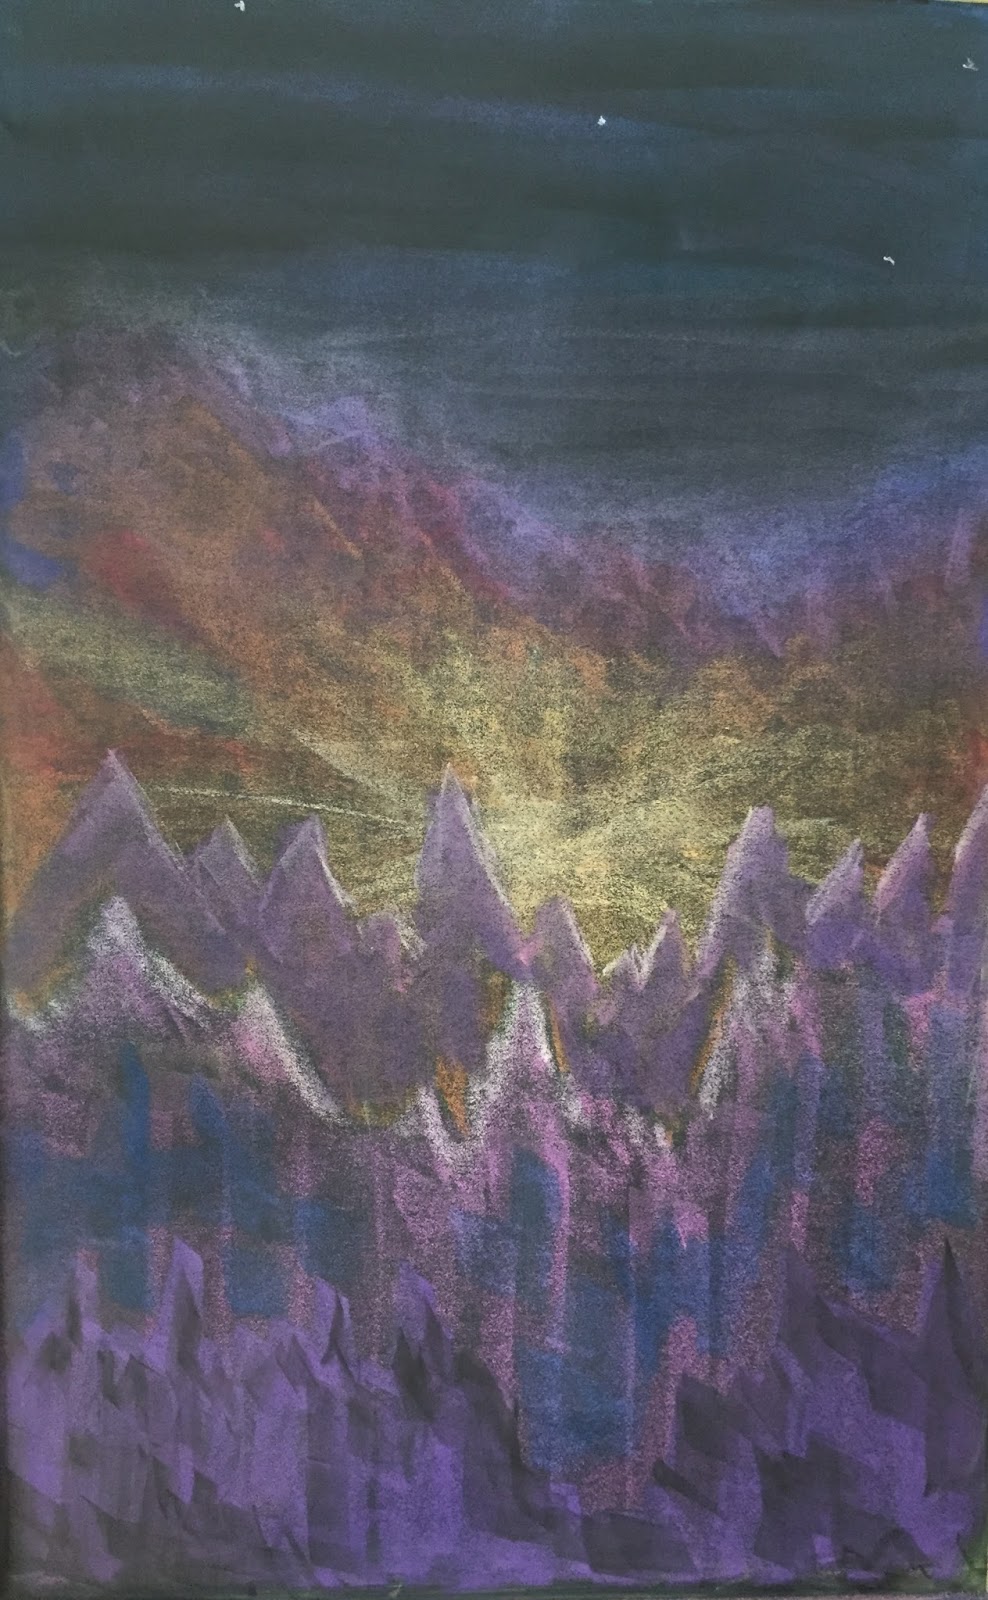
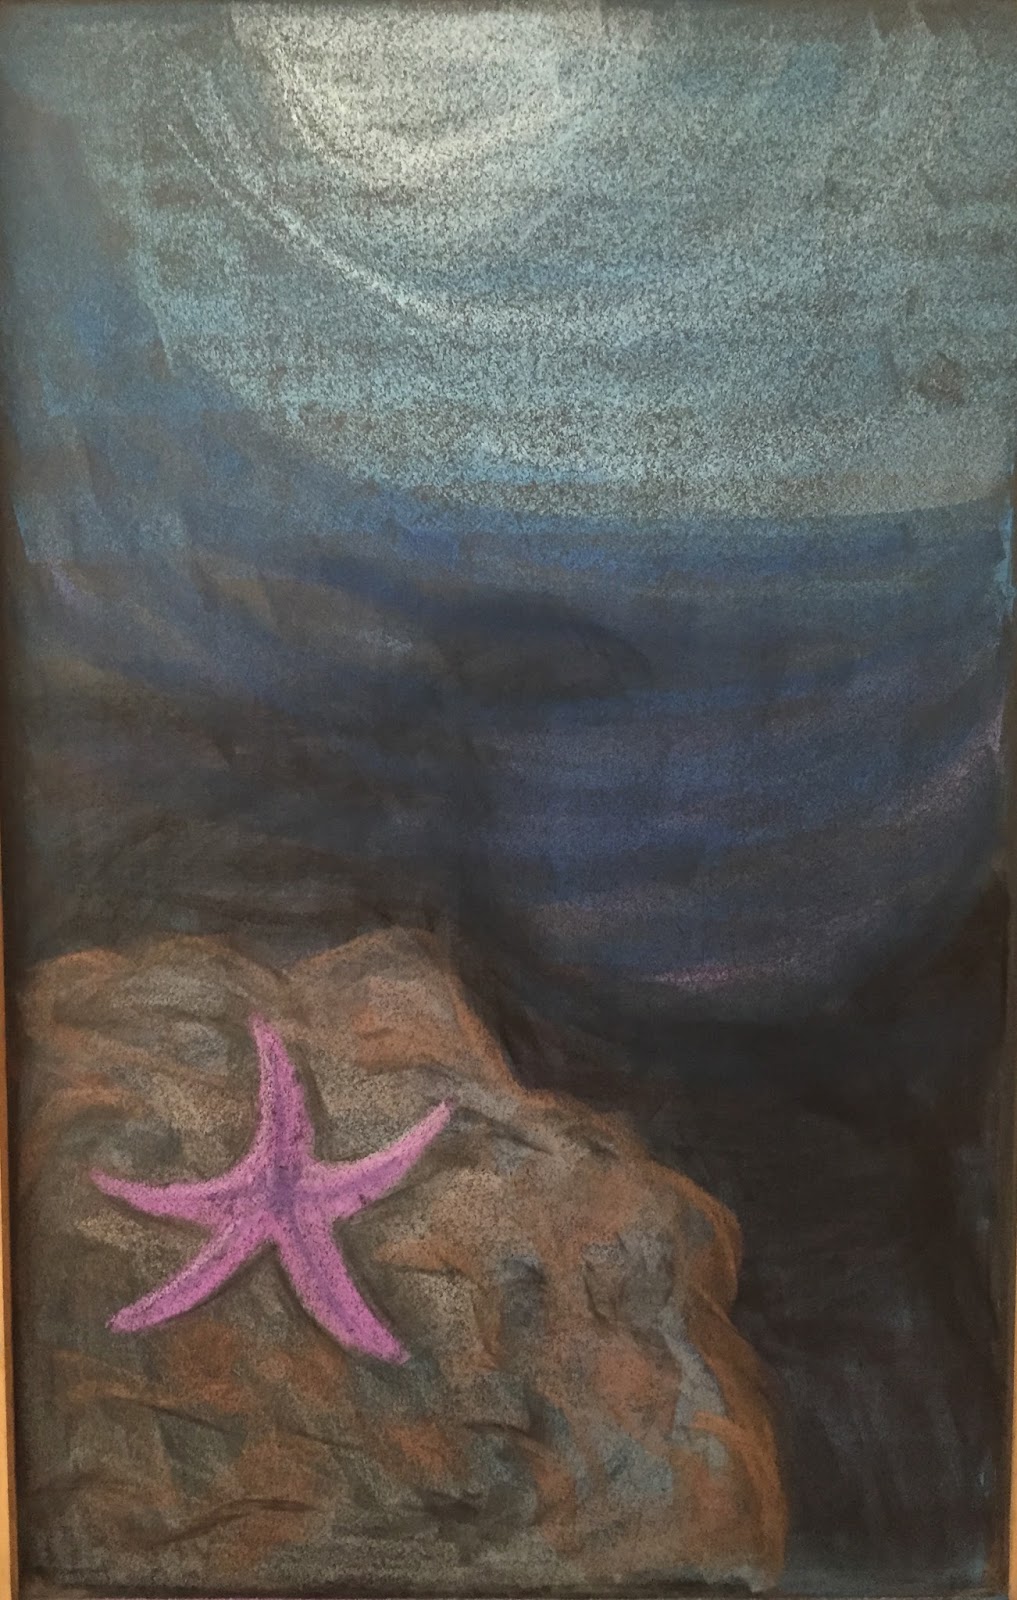
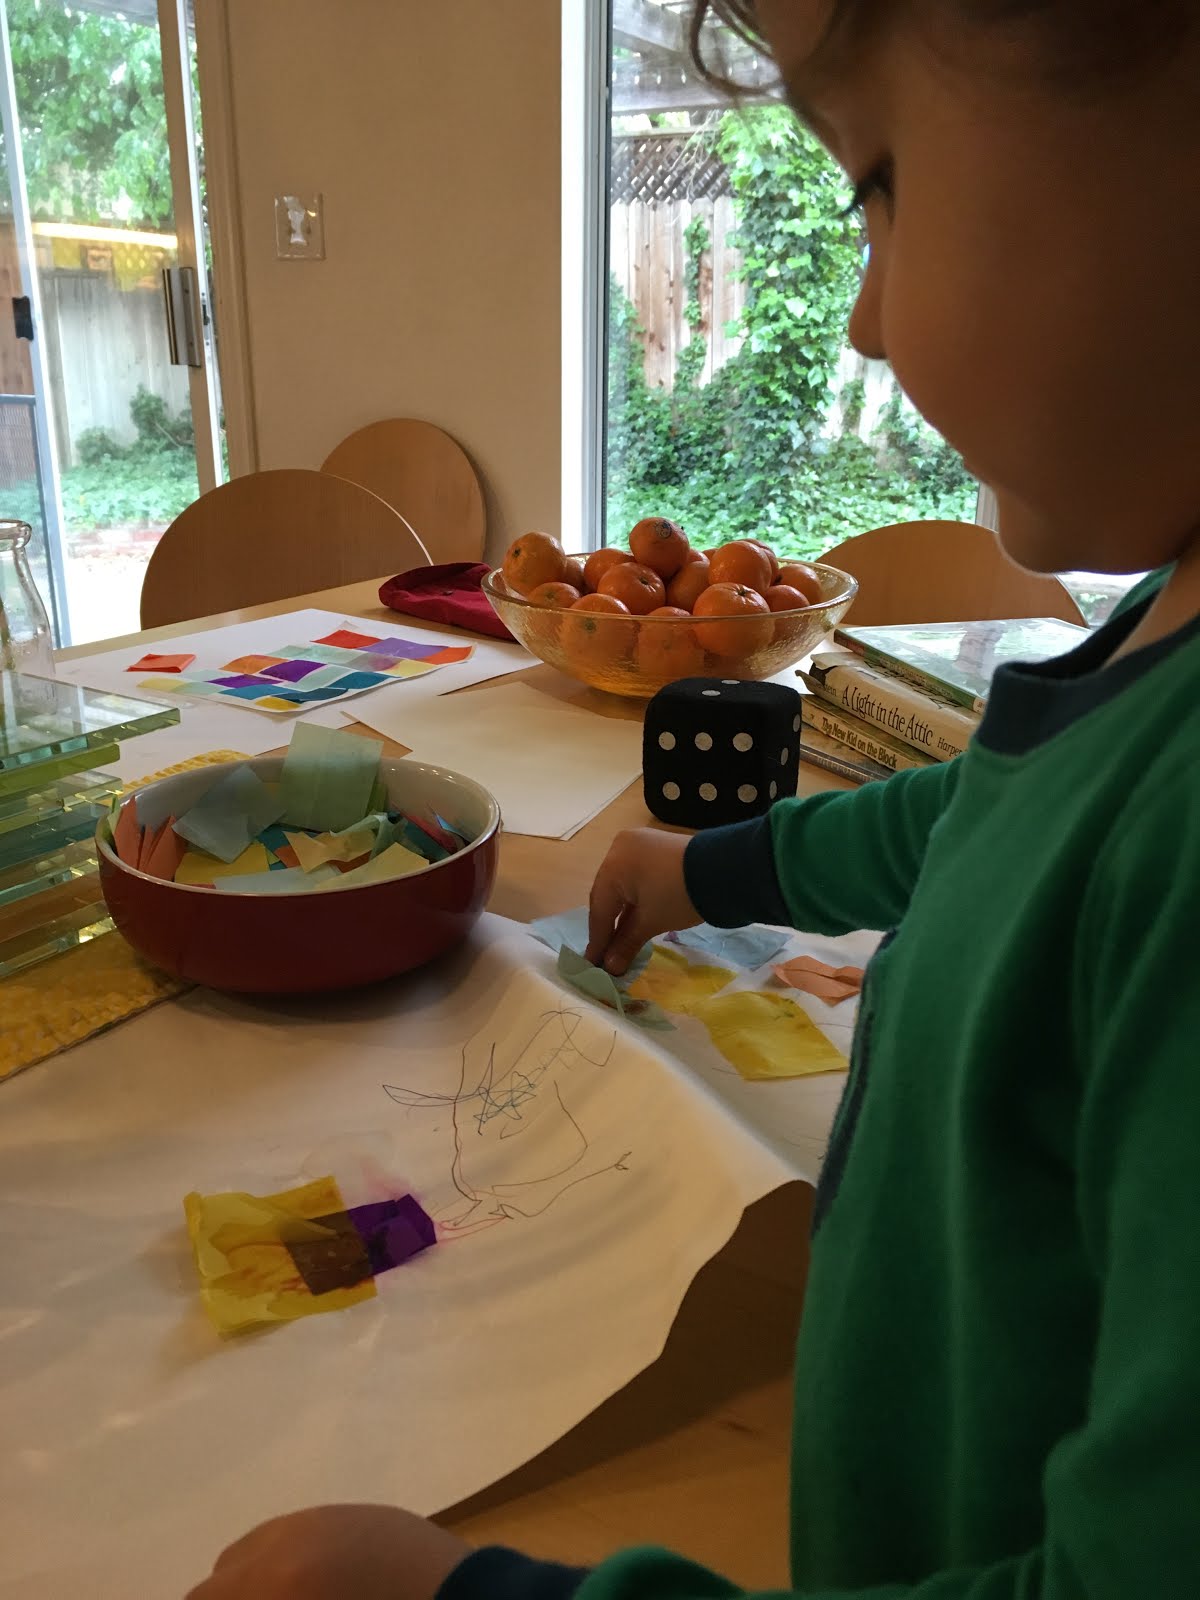
We started with a little art project. We used plain water to wet a small piece of heavyweight paper, then added a squares of colored tissue paper, with a little more water brushed on top.


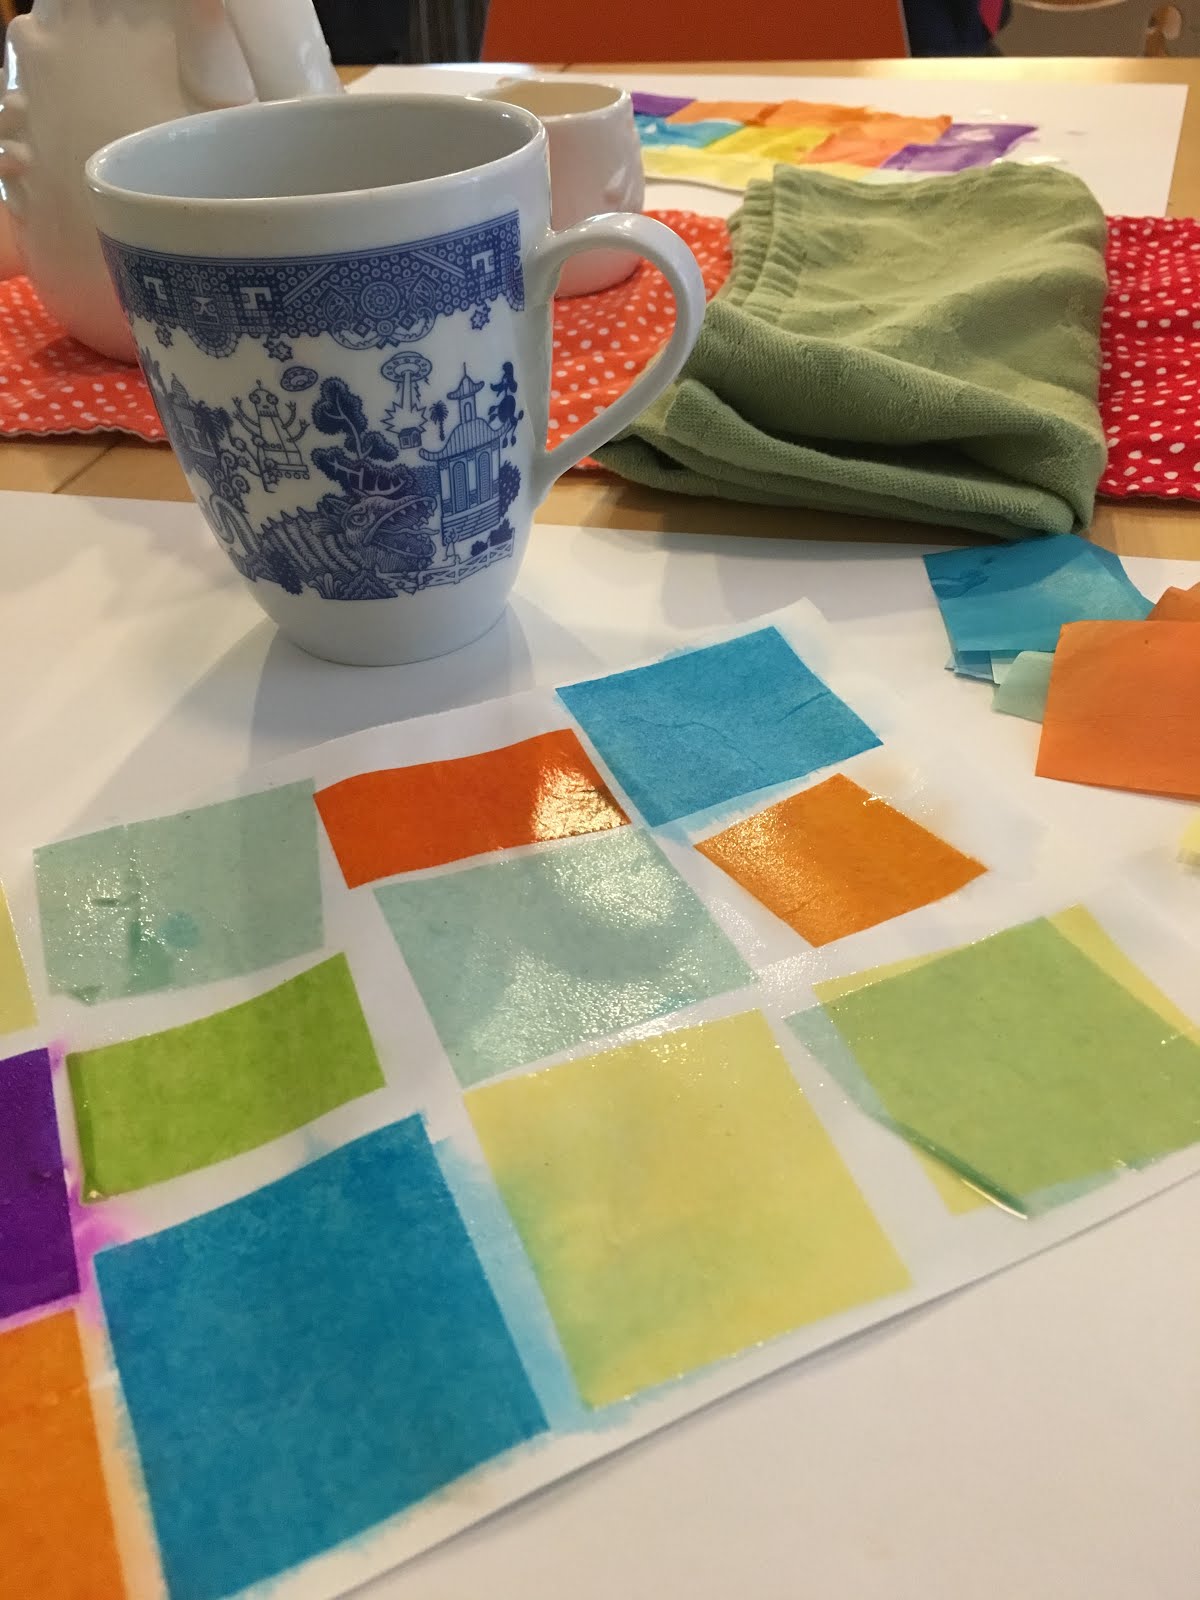
When it was dry, we took off the squares to reveal the colors that had bled onto the paper.
I assigned a part of speech to each color, and we ended up with two colors being nouns, two adjectives, one verb and one the choice of adverb or verb. The result:
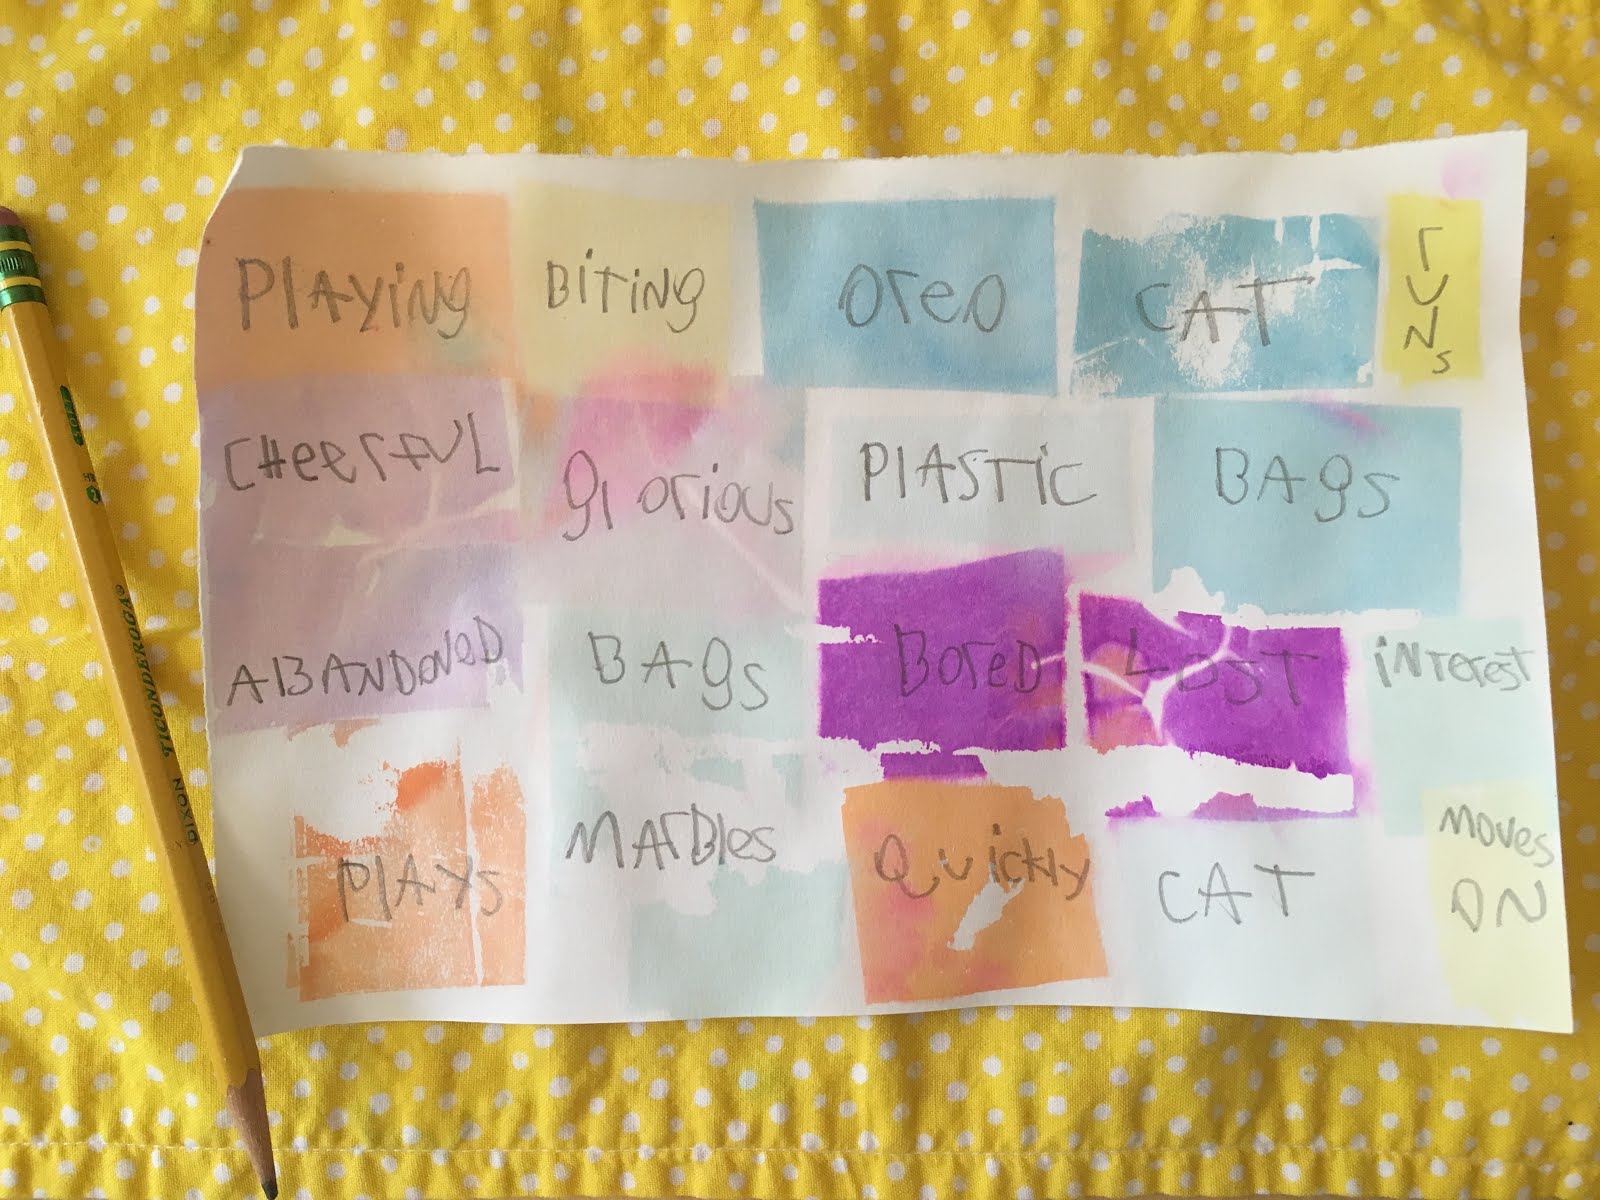
It was challenging at times to come up with a word that fit the poem and parameters, so for younger kids I would probably have a jar of nouns, verbs, and adjectives that they could choose from to help compose their poem.

Our second poem was a bit of a game. I had a pair of large stuffed dice (bigger is better when you play!) that determined the number of lines and syllables for the poem. First, I had them roll one die to determine the number of lines for the poem. Next, they used both dice to decide the number of syllables for each line. So for the first poem, Max rolled a five for five lines. Then he rolled the dice five times to determine the number of syllables for each line. Of course you can use regular dice, but the stuffed dice can be thrown at the wall, the window, or rolled across the floor, which is much more fun than the table.

Both of the kids reported that they enjoyed creating poems this way, and even the three year old tried his hand at it. Well, it actually turned into a "Super Mario course with buildings and crocodiles", but we never know where a poem will lead us, do we?

April is National Poetry Month, and there are two fabulous resources to celebrate with your kids. The Academy of American Poets has many resources for parents and teachers, including a free poster and a list of 30 ways to celebrate. Julie Bogart and her team at Brave Writer have created a fabulous new site celebrating poetry tea time and the family. There are poet interviews, recipes, ideas and resources, and right now there is also a contest! Check out #poetryteatime and #PoetryTeaTimeContest on Instagram for inspiration, and don't miss the site, poetryteatime.com


Tuesday, February 16, 2016

An Easier Way To Do Long Division


Long division is not fun. At least according to my 11 year old.  However, there is an approach to make  it more accessible, especially for kids who look at the problem and have no idea where to start. Division is often taught to young kids as the process of partitioning an amount into smaller groups. We give them ten Lego guys and ask them how many groups of two they can make. As kids get a little older, we point out that division is the inverse of multiplication, which usually works well with facts. But if multiplication is just repeated addition, wouldn't the inverse of that be repeated subtraction? Yes! Viewing division as repeated subtraction can remove the deer in the headlights stare we often see when a child faces a long division problem. Let's start with a simple example:


 If we start with 10÷5, we can subtract 5 once from 10, leaving us with 5, then subtract 5 once again and we have 0. We subtracted 2 fives, so the answer is 2. Follow?

Now for bigger problems. Kids are usually comfortable with doubling a number or multiplying it by 10. Multiplying by 5 is just halving ten, so that's not usually a problem, either. We will work with multiplying the divisor by 1, 2, 5, or 10, using repeated subtraction, to solve the problem. That's it. Let's look at my super high tech example:


 The numbers on the right side indicate whether I multiplied the divisor by 1, 2, 5 or 10.  Once I get to 0 (or less than the divisor), I add the numbers on the right to get my answer. Note that you are always subtracting from the whole dividend, not portions of it as in the standard algorithm. Here's another example:

When kids get comfortable with this method, they start seeing that doubling the double is times 4, or if times ten is slightly too big, they will subtract one divisor to get times 9, and that's exactly the reasoning we are looking for! Conversely, some kids are only able to start with doubling and multiplying by ten, and that's okay, too. The problem may take awhile to finish, but the calculations are easy, which reduces anxiety.

I did show my kids the standard approach later, after they had mastered this one, and allowed them to choose what made the most sense to them. They both thought this way was easier, and allowed them to tackle the problem right away with confidence. Once your kids understand the concept of long division and can accurately solve problems, do them a favor and move on. Calculation is a small portion of mathematics, and in reality, nobody does long division by hand. Of course you and I will grab a calculator, but even people who use math in their careers every day use a computer or calculator to do computations. Math is reasoning, patterns, problem solving, spatial thinking; get to the good stuff once they have basic competency and stop beating a dead horse with pages of long division. Here's a link to my periscope about this strategy.

Sunday, January 31, 2016

The Problem With Math


October was a beautiful month. The weather was warm. We took a vacation. And my son told me he was enjoying geometry. Enjoying geometry may not sound like an earth-shattering comment, but it was for me. Math has been a constant struggle for about two years now. It hadn't always been that way. When he was young, math was one of his favorite subjects, next to history. He was quick to understand concepts and could do most calculations in his head. He was confident in his skills. Then we hit the big stuff - four digit multiplication, long division and the like. Stuff that I didn't think you could do in your head. Steps you had to work out on paper. He hates to work out stuff on paper. He hates lots of tedious steps. He fought me constantly. We struggled through fifth grade math. 

This year we went back to a full Waldorf curriculum, including math blocks, starting with geometry in October. In Waldorf,  sixth grade geometry is all hands on, making drawings with compass and straight edge - no calculations or formulas yet. He loved it. He looked forward to the drawings. He enjoyed the process and the coloring of the design. It was wonderful; yes, almost blissful. Then October ended, and so did geometry.

I was using Jamie York's Making Math Meaningful curriculum and daily practice. I think it's a good program - a mix of mental math, word problems and review problems of previously learned material every week, with only a few problems of each. It didn't look overwhelming, and yet we were back to the same struggle. He wouldn't finish his work for the week, or simply write down random numbers for answers. Eventually, he just refused to do anymore math. Ever. Period.

I would love to tell you that I handled all of this with the utmost grace and patience. I have tried to encourage and offer support. I have also yelled. I have threatened. I have predicted a life of burger slinging and poverty wages. Of course none of that made any difference. Of course it only made things worse.  We were both frustrated.

What I had also been doing was researching. It's a natural response for me, and it has served me well over the years. I had compiled lists of books and web sites. I was reading articles and going through curriculum. Before Christmas, I just happened to open an Amazon sale email one morning. Normally, I delete them without evening looking, but for some reason I opened it and there was a picture of Mathematical Mindsets, a book from my wish list, with the notice that it would be going on a flash sale at noon. I took it as a sign and bought the book. Yes, it was divine intervention.

I began reading Mathematical Mindsets in the week before Christmas and I thought, "I want to discuss this book with other moms." I wanted the kind of conversations I had during inspiring in-services when I was a classroom teacher. I wanted to pick brains, compare stories, dig deep into the revelatory information contained between those pages. Perhaps my friends might be interested? Perhaps there might be more? I had been watching the ever-inspiring Julie Bogart on Periscope and had joined the Bravescopes Facebook group. Julie often speaks of having "big juicy conversations" with your kids, so why not have them with other homeschooling moms? I let the idea lounge around for awhile because I was nervous. Nervous that nobody would be interested. Nervous that I would start a group with myself as the sole member. But once I have an idea in my head I don't let it go without a fight, so I took the leap and started the group, Big Juicy Conversations About Math. It's been about a month, and we have almost 100 members! 

I intend to share our math journey here as well as in the group. To reflect on what we did right when they were young. To analyze where we went wrong these last few years. To begin to chart a new course, a new way of approaching math without tedious steps and a page full of practice problems. To bring back the joy. I hope you will join me.

Sunday, August 30, 2015

Super Cute Felt


During a web library search for a different felt book, I stumbled upon Super-Cute Felt Animals by Laura Howard and thought I'd give it a try. The patterns are simple, very simple, but that makes for perfect beginning sewing projects for kids. The animals are also small, around four inches on average, which makes them super quick to finish - another bonus when sewing with children! My eleven year old is learning to hand sew this year, so we worked together on a few projects from the book:


and here are the fish and the whale on this month's nature table:


If you have even moderate sewing experience, you may find this book a little disappointing. These designs have a single front and back piece, which makes them essentially flat, even when stuffed. For felt animals that I plan to sew for the little guy, I'm using slightly more complicated patterns from another book. That said, I have enjoyed working on these projects! They are super fast, as in whip one up after breakfast for play time that morning fast, and my son can complete one without getting frustrated. They would make cute ornaments or backpack friends, and although I could draw up the patterns myself, it is so much more convenient to trace or photocopy them and hand them off to be completed by the next available child. I would definitely give this book a whirl if you have a beginning sewer and can find it at your local library.

Monday, August 24, 2015

Guest post at Waldorf Essentials


I have a guest post today about planning for the school year over at the Waldorf Essentials blog. Please pop over and check it out!

Sunday, August 23, 2015

Dangerous Things


I spent an afternoon binge listening to the NPR TED Radio Hour podcast while I sorted through our bookshelves and homeschooling supplies recently.  If you've never heard them, you must subscribe; seriously, do it right now. You won't regret it. For the podcast, they pick a theme, then play portions of TED talks which relate to that theme, and also interview the presenters. A talk, 5 dangerous things you should let your kids do, caught my attention. Granted, the notion that you should allow your children to take risks or try activities that might not be approved by the AAP is not a new idea, but this talk sparked a little more reflection than usual on my part. The older kids were spending a week with their grandparents, and during a FaceTime call my son showed us the sewing machine he had just made a project on. My first reaction was surprise and a little thrill, since he really enjoyed sewing (hooray!). My husband's first reaction was something like, "Wow, be careful using that." He saw danger. I did not.

The next day my father in law called to ask how to cook the allergy friendly mac and cheese I sent up. After talking him through the steps I mentioned that Madeline could help, since she had made it before at home. He noted his concern about boiling water. He saw danger. I did not.

While camping, my husband taught Max how to make a camp fire. He let him build it, feed it and stoke it. It was a pretty big fire. I saw danger. He did not.

Upon reflection, I realized how intimately connected the risk we allow our kids is intertwined with our own feeling of expertise. My mother in law and myself are completely comfortable with kids using a sewing machine because we both sew. I sewed on machines at ten years old. I started cooking around that age, too. Baking actually - from scratch, the whole nine yards. So I feel comfortable with teaching my kids to use the stove and oven. My father in law, and my husband for that matter, see the risk, because they are not comfortable in the kitchen. Just as I saw the risk with the camp fire, which is not part of my responsibilities when we camp.

Of course, now the question becomes how do we get comfortable with risks that are outside our areas of expertise? Oh, that is the catch, isn't it? How did my mother feel comfortable with me using the oven when she'd never made a cookie from scratch in her life? While I'm pretty good at letting my kids use tools and appliances to create what they wish, I'm much more protective with physical risks. Climb that towering tree? Jump off of high places? That's much harder for me to approve. And yet we know that's exactly what we should be doing, within reason. We should be allowing for wings to expand, for space to explore, for challenges that just might cause injury, but definitely will cause pride and a sense of accomplishment.

It's still an open question for me. I am making more of a conscious effort this year to allow more risks in areas I feel comfortable with (more sewing!!!) but also encouraging my husband to expose the kids   to things he feels confident in (power tools, anyone?). And those dangerous things that scare me? Well, for now, once in awhile, I will try to smile and say, "sure, but be careful." Try.

Do you allow your kids to do "dangerous things"?

Tuesday, August 18, 2015

Not Back to School


Well, it's that time of year again, when we homeschoolers don't go back to school.  We started our day with a walk to the park, and unfortunately, the timing was just wrong on this shot so I didn't capture their sweet hand in hand stride.


Both kids are starting off with sound for physics this year, so our first board went with the poem by Rumi, "The Breeze at Dawn."


Alex got his own board to match the ocean theme of his nature table this month. We have been making little felt creatures to go with it, but more on that in the next post.

Two days in and we all survived. It's a heavy academic year, with both kids in middle school, and the planning this summer was tremendous. I know it will pay off, but I have to admit that I am somewhat mourning the loss of my last month of summer! It is fantastic to be back in that learning rhythm. I do like having more structure to the days, and that sense of accomplishment when items are checked off of the to-do list. The school rhythm is a work in progress, as right now I only have academics scheduled. I'll be using the next two weeks to figure out where to add in form drawing, handwork projects, exercise for the kids and piano. Yes, form drawing in middle school. We haven't done much of it, since we came to Waldorf late, but I think both kids could still benefit from it, especially to improve handwriting. Madeline enjoys it; she says she finds it meditative. Isn't it fantastic when they unexpectedly express exactly what is supposed to be happening on a deeper level? Then you really know this "crazy" Waldorf stuff is working!

Thursday, July 30, 2015

Waldorf DIY


This summer the wee one turned three, and I thought he might be old enough now to incorporate some little Waldorf inspired bits in the house. Fingers were crossed that they wouldn't get ripped apart immediately or sent to permanently live in the train cars or truck beds. There are some lovely Waldorf toys in catalogs and on Etsy, but I was looking to create some pieces from what we had on hand. 

First off, I wanted a Days of the Week calendar. In Waldorf, each day of the week has its own color. I used two pieces of our birthday ring for the base, a wooden candle from a play food set, and a wood teething ring (!) for the day marker. The gnomes are just simple peg dolls that have a small base which fits perfectly in the ring. I decided not to write the days on the peg dolls since he can't read them anyway, and the color signifies to the little ones what day of the week it is. I was thrilled to get an additional use from the birthday ring.


I felt that now he was finally ready for a nature table, but I didn't have a good spot in the house for it. So I found a wood tray (I think from a Doug and Melissa set), threw in a piece of green knit fabric and we had a nature tray! The tree was made from a twig that I glued to a block and used a bit of wool roving for the leaves. For the first week I just had the tree and some rocks. 


Over the next few weeks I added the bushes, some felted animals, a rubber frog to represent some we found in the creek, and  sun and moon gnomes. There is a little summer sign with a hand cut stamp, and I used a Scrabble tile holder as the base.

He likes to play with the pieces (as I knew he would), and sometimes they migrate to other places, but that's okay with me. He enjoys them, I didn't have to purchase anything, and they look cute on the bookcase!

Sunday, May 31, 2015

Exhale. The combination of a toddler and technical issues with Google has left this blog quiet for far too long. There are many posts in the works, if the tech gods continue to be on my side;) For now I leave you with this week's chalkboard drawings, my favorite Waldorf obsession:


Soldiers' Tree
Wish

Baa Baa Black Sheep


Friday, December 6, 2013

Lego Geometry - Circles


Circles from rectangular building blocks? Am I crazy? No, I did not give the kids the task of creating circles from Legos, but we did create tools from Legos to make circles! The bricks pictured above are the ones we found in our collection that worked the best, but sort through yours and see what you can find.


Our favorite compass consisted of a long rectangular flat block with a half circle piece at each end (the kind with the holes). To make a circle, secure the compass at one end with a sharp pencil, then use a second pencil through the other hole to trace your arc. It helps if you tape the paper down first or have somebody hold it.


Flat pieces that have holes in the center also work well. The circular piece needs a very sharp pencil point as only a small portion shows.


The kids experimented with different sized pieces to make smaller and larger circles. We discussed pi and they measured diameter and radius, as well as calculating circumference. Who said Legos can't make circles?


Tuesday, October 8, 2013

Lego Geometry - angles


Math is not a favorite subject for either of my children, even though it comes so easily to Max. I am always looking for a way to make it more fun, more appealing, and nothing is more appealing to my kids than Legos. So, when we started a geometry unit, I thought it would be a perfect pairing. I sorted through the Lego baskets and pulled pieces that would work well with line segments and angles, our first lessons. I mostly selected the thin, single row Legos you see above, in different lengths. I introduced the concept of lines and line segments using the pieces, then we made parallel and perpendicular lines using the bricks.

Taking those line segments and perpendicular lines, we snapped them together (or pivoted them, in the case of perpendicular lines) to create angles. We opened them to different widths to show acute, right and obtuse angles.


We traced them in our math journals and labeled the three different kinds of angles. You need to trace the inside of the angle, not the outside. It also helps if someone holds it, because they have a tendency to shift on you while you are tracing!


The next day I told the kids to create five different angles and trace them in their notebooks. I expected that they would make five individual angles, but they both surprised me with their approach. Max made one angle, then just pivoted it to create different degrees. Madeline took the right brain approach and created the structure on the right, then laid it in her notebook and traced the different angles it creates. I love their creative problem solving!

Thursday, September 19, 2013

Eggshell Geodes

This has to be one of my favorite science experiments! We have made crystals in different ways, but the crystal formations from one method we tried was just amazing.

Directions for these "geodes" can be found all over the internet, and these are made from Epsom salts and water.  The photograph above shows the results of two different curing methods. The carton on the left was grown in the refrigerator. The one on the right was left in the kitchen window to dry out. These pictures were taken a couple of months after we made them, so the original color has faded somewhat.

The refrigerator method gave much larger, more impressive crystals. For both batches we used these basic instructions. On another blog I read the idea of putting them in the refrigerator to crystalize, but I'm afraid I can't remember what blog it was. Another hint I read from the unnamed blog was to make sure you have a good slurry. It's the slurry you want in your shells, not the thin top liquid.
Here is a close up of the air dried version. The crystals were much finer, and sparse. It actually took about a week longer for the liquid to dissolve in the air dried shells versus the ones in the fridge!

It's a simple experiment, calling only for a few ingredients and about ten minutes of actual work time. I had been saving eggshells for a few weeks prior, rinsing them and letting them dry in the kitchen window. The fun came in watching the crystals emerge over the next two weeks. 

Monday, September 16, 2013

Review Rings


We are starting to find a comfortable rhythm for this school year now, so for the next couple of posts I will be sharing some of our strategies and creative lessons that we have planned for the year. I have always incorporated review into our plans, but I can't say that the kids rejoice over worksheets. I wanted to include systematic review this year, since we deal with attention issues around here, but I didn't want it to be cumbersome for me or the kids. The review rings were born. 

They are exactly as they sound - review cards on a binder ring. I started out making them from cut up old worksheets and textbook pages, with some flash cards thrown in for good measure. I then added some hand written cards that touched on topics from social studies, science, and the literature we have read. Of course I pulled out my trusty laminator so I could reuse the cards during the year and for the little one in the future.


There are only a few problems per card (sometimes only a single question), so the kids don't find them overwhelming. The wipe off factor seems to help, too. For some reason, using a wipe off pen seems less burdensome to my two students than a pencil. They are part of their daily independent work time. My goal is to create a few more each Sunday, covering what we learned the previous week.

I covered a baby shoebox with scrapbook paper to make a home for the cards. I added dividers by subject, and I simply file the ones they have completed in the back of each section. I don't keep track of which cards they have completed because it is review, after all. If they get the same math card again, that's fine with me. Practice never hurts.

Alex thought those cards were pretty cool, too, so he got his own set. I found some adorable color and number flash cards at Mr. Printables. If you have never been there, you must check out his site. It is fantastic. The Dollar Spot at Target also had some great photo and Dr. Seuss flashcards, so now the baby has more cards than the kids! He very much enjoys dumping all of the out of his box and spreading them around the floor. I wish he also enjoyed picking them back up!


Sunday, October 16, 2011

Museum Scavenger Hunt Book

We have several museum trips coming up, thanks to free and reduced homeschool days, and I love using scavenger hunts to help focus the kids' energy when we are there. However, I do not love carrying a clipboard around, or trying to write against a wall or knee, or searching through the backpack for a pen. My solution? A book! I printed pre-made scavenger hunts from the Monterey Bay Aquarium website (many museums have them listed under the teacher resources, or you could make them yourself from pictures from the website) and bound them in a sturdy chipboard book, sort of following Angry Chicken's directions here. Instead of stapling the pages together, I folded each page in half and glued them back to back. Then I glued the first and last pages to the covers which made end pages and at the same time, secures all of the pages to the book.
This allowed the whole page to fold down for viewing, and the floating spine enables you to fold the whole book backwards. The hard chipboard covers (I took mine from the back of a sketchpad) provide a perfect surface for writing.
To keep track of the elusive pen, I added an elastic loop between the back page and the cover. To add extra hold insurance, I glued it down and then covered the edge with gaffer's tape.
That's all there is to it! Now I have a pint sized book of fun to focus our attention and our energy, and maybe discover something we hadn't noticed before. Now if I could only make our lunch bags and water bottles pint sized...

Monday, August 22, 2011

Geology Learning Kit


Learning kit number two - the geology basket. We are studying geology along with space, and we like to get hands-on with our work. I used a recycled basket (once the home to Numi teas), and added an extra clasp and handle to make it more portable. The handle is simply a corrugated cardboard  tube with raffia threaded through and tied on the underside of the lid.  A button and cord provided extra security to the front of the basket.
I gathered materials we had around the house for supplies. I included a magnifying glass, rock guide, notebook, pencils, colored pencils, a sharpener and eraser, small tape measure, paint brushes and a specimen box (i.e. recycled scrapbooking flower tin). It's easy to take outside for a little backyard geology, and while I don't tote it on hikes, it's nice to have it all in one place so I can throw the supplies in my backpack as we head out the door.
Science on the go
Time to take a hike!

Monday, August 15, 2011

Solar System in a Cylinder

I was browsing the Playful Learning and Imagine Childhood websites this weekend, and their products reminded me how much I love kits. The passion started early, when I would walk into those Sanrio mall stores and salivate over the little boxes filled with Hello Kitty stationary, stickers, and miniature pencils. Years later, I loved walking the aisles of Papyrus, lingering over the beautifully packaged cards and wrappings. Oh, and gift baskets, with all of those special little treats all bedecked with ribbons? Sigh.

Educational kits are fabulous, but often expensive. Why not make them myself? I could tailor them to what we are studying this year, use up some of those craft supplies that seem to breed in our home, and maybe motivate the kids in the process? Introducing....
Yes, the entire solar system in a can. Actually, it's a bunch of wool roving in a decorated coffee can. I chose bits of roving in colors to match the planets, then packaged each in a baggie (to protect it from the coffee smell that still filled the inside of the canister). The kids first had to decide which baggie was which planet (with the help of a book we read on the solar system), and then we tried turning the wool into felted balls. We used a You Tube tutorial at first, but it didn't go so well. Darling son said the wool made his hands itch and promptly left the activity. Considering he's allergic to everything, I didn't argue. Then I recalled that Amanda Soule had a tutorial in The Creative Family. I knew it would be kid friendly and easy, and it was. We used the kitchen sink instead of bowls outside (it was ninety degrees, after all), but the balls came together much better. I highly recommend the book, by the way. It's full of great projects and packed with good old fashioned inspiration.

Interest lasted for about two balls (it is time consuming), so I ended up doing the rest. I loved the process - very meditative. We set them outside to dry:
The kids have checked on them several times now, and are more excited about putting together a mobile with them when they are done. I haven't decided what to make the rings out of yet. Felt? Colored wire? I'll probably let the kids have the final say. Overall, they enjoyed most of it. I liked using up some supplies and having a project wrapped and ready to go. I have one other kit done that I will share next week, and more in the planning stages. Maybe I need to make a few adult ones as well. Who says that kids are the only ones allowed to have fun?