Showing posts with label made by you mondays. Show all posts

Sunday, September 16, 2012

GFCF Chocolate Zucchini Snack Cake

 This is our new family favorite, and apparently the dog's favorite, too, since we came home to an empty 9x12 pan the first time I made it. She went to the trouble of taking it off the counter and removing the lid from the pan, so it must be worth the effort!

It was based on my carrot cake recipe, but with some modifications to make it a bit healthier, so I can call it a snack and eat it more often. It's easy peasy to make, and puts all of that zucchini to good use if you are sick of zucchini bread.

Ingredients:


1 1/2 cups organic sugar

1 cup coconut or sunflower oil

4 organic eggs

1 tsp vanilla

3 cups grated zucchini

3 cups Bob's All Purpose gluten free four (or your preferred mix)

1/4 cup raw cocoa powder (of course you can use regular, but the raw has more minerals and iron)

1 1/2 tsp xanthan gum

2 tsp pumpkin pie spice

1 tsp baking soda

1 tsp gluten free baking powder

1 tsp salt

1/2 bag of  chocolate chips (CF for those making this dairy free)


Preheat oven to 350 degrees. Cream the sugar and oil. Add the eggs, one at a time. Add vanilla. Mix dry ingredients in a separate bowl, and wisk to mix. Add the zucchini and flour mixture, a cup at a time, alternating each and mixing well. Add chocolate chips and stir. Pour into a greased and floured 9x12 pan (use cocoa for the flour and you won't get white specks on your cake) and bake for around 35 minutes. Use a toothpick to test.

I don't frost it, but you could dust it with powdered sugar, or frost if you are going for a traditional cake. I skip the extra sugar so I can eat extra cake!

Sunday, September 9, 2012

Lego Towel


This is one of my favorite projects, and it's so easy! I don't have a tutorial, but it's simply an appliqué on a store bought towel (I got mine at Target for $5). I used fleece for the lego head. I chose fleece because it's soft and I had it on hand, but a micro-terry or french terrycloth would work as well. I did a Google search for lego heads and then drew the face on Wonder Bond free hand. I followed this procedure for the appliqué process, but I used a pressing cloth over the fleece (it melts!) and a lot of extra time to get the bond to stick. A little stitching and you have a custom Lego towel! It was Max's birthday present and has endured months of washing and is still going strong.

Sunday, March 25, 2012

Ruched Maternity Tops

I love the look of ruched maternity tops. I am carrying all out front, so if I put on a regular maternity tee, I look like a linebacker. The ruching defines that tummy, so it's obvious that you're pregnant, not fat! However, I had several regular maternity tees (they are usually cheaper and often what you find second hand) that I wanted to wear, so I brought out my favorite sewing trick - elastic thread. Yes, you could use regular elastic for this, but I find I get more consistent results with the thread (I sew on a vintage Bernina, which I adore, but it does not have that nifty three step elastic stitch). I have a more detailed account of how to sew with elastic thread on this post, but here's the quick and dirty:
I started with a plain Jane maternity tee. Sewing on the RIGHT side of the fabric, I made three rows of elastic thread next to each side seam.
I ran the stitches from just above the hem line to three to four inches below the armpit. Once you have sewn both sides, spray with water and then steam iron the stitching. It cinches up like magic!
That's all there is to it! Of course I couldn't stop with just one...
I had total pregnancy brain with this red shirt, and accidentally added my rows of stitching to the back, not the front of the shirt. So, to fix my mistake I just did three rows on the front side of the seam, and three rows on back. It works just fine and gives really nice gathers to the back of the shirt. Instead of a mistake, I prefer to call this a style detail.

Monday, January 30, 2012

In our homeschool, games are a regular part of the curriculum. With an ADD daughter and a son who dreads math worksheets, games are a fun way to liven up a sometimes dull subject. I was inspired by this marble arch game on Pinterest, but made a few changes to make it more versatile.

I used a whole box, minus the lid, so the marbles wouldn't run everywhere. The top and sides are covered with scrapbook paper, because I'm lazy and didn't want to wait for two or three coats of paint to dry. I painted the front with chalkboard paint (sigh, how I love chalkboard paint!), so I can change the numbers depending on what each child is working on. For the example above, you shoot two marbles through the arches and then multiply the numbers. Of course you could add, subtract, or divide the same way. But why stick with whole numbers? You could use fractions, decimals, or negative numbers. You could play with fraction bars, so the child collects the corresponding fraction bars until they have made a whole. You could use pattern blocks to practice geometry and/or cover a pattern block card with a design. You could use coin amounts and have the child collect the corresponding coins until they reach a dollar (or other specified amount). I love having wipe-off games that I can customize to whatever skill is needed!

Thursday, September 8, 2011

Mystery Box

My new comprehension tool - the mystery box. This is slightly different from the learning kits I have been putting together, as you can change this one from day to day.
I used an old Math U See box and painted the top with chalkboard paint.
I filled the inside with items related to the Phoenicians, the section we were about to read in our history book. I had the kids inspect the items, and told them they needed to figure out how they related to the Phoenicians. This made them listen closely to the chapter, then use their critical thinking skills to figure out how the items were connected to the passage. It also helped my visual learner process the information in the book. The best part is that I can erase the title, fill it with something else, and use it again tomorrow!

Monday, August 22, 2011

Geology Learning Kit


Learning kit number two - the geology basket. We are studying geology along with space, and we like to get hands-on with our work. I used a recycled basket (once the home to Numi teas), and added an extra clasp and handle to make it more portable. The handle is simply a corrugated cardboard  tube with raffia threaded through and tied on the underside of the lid.  A button and cord provided extra security to the front of the basket.
I gathered materials we had around the house for supplies. I included a magnifying glass, rock guide, notebook, pencils, colored pencils, a sharpener and eraser, small tape measure, paint brushes and a specimen box (i.e. recycled scrapbooking flower tin). It's easy to take outside for a little backyard geology, and while I don't tote it on hikes, it's nice to have it all in one place so I can throw the supplies in my backpack as we head out the door.
Science on the go
Time to take a hike!

Monday, April 18, 2011

Winter t-shirt to summer top

The Jesse t-shirt was one of Madeline's favorites from this winter, but only a few months after receiving it, it was already getting small (that girl can grow!). Since the graphic was so large, an applique would be difficult, so I decided to make a summer tank top instead. Oreo decided that he should be the subject of the photo shoot, so I'm afraid my "after" pictures are dominated by a little black and white feline. He may be male, but he's still a diva.

First I cut off the arms and the collar, straight across.

I sewed a cotton ruffle to the bottom to add length.

I added a band of the same material to finish off the front and back (basically a 2 inch bias tape strip).

I used a thin bias tape to finish off the arms and extend for ties. The front was a little big, so I ran a few rows of elastic thread across the front and back bias strips to tighten it up. You could also run a piece of elastic through the top strips before sewing them down.

Yes, Madeline is thrilled with her new shirt, but I think Oreo likes it most of all.


Monday, March 21, 2011

Scrappy Skirt


Lots of sewing happening during these rainy days: new garments, re-fashions and mending. I've had this khaki skirt in my closet for years, and last year set it aside for embellishing. Since I had the scraps out for other projects, I decided to use some on this as well.
A very quick, simple applique. I decided to straight stitch the edges to keep with a more primitive look, with some intentionally quirky outline stitching around the tops. I continued the pattern around the back a bit, too.
 Sorry for the bad inside shot, but it's gray and blustery outside. At least the skirt looks like spring!

Monday, February 7, 2011

T-shirt Bag


I have a stash of Max's old Lego t-shirts, cut apart for a planned t-shirt quilt. Well, he has decided he wants a universe quilt from Land of Nod (it's pricey, but by is it gorgeous), and really, when am I going to find the time to make a full sized quilt? So last night one became his Valentine's Day present, a library book bag. I had originally intended to make a lunch sack, but the print was too large on this shirt. I think I'll try that next with a smaller print shirt. This was an easy evening project, and would make a great gift bag, too. I fused the t-shirt pieces to some blue cotton, to give it stability and an easy lining. Otherwise, I simply made it tote bag style, with side pieces and a bottom. Since the graphic ended near the cut off neck line, I made a binding for the top to attach the handles to.

I can envision more tote bags, gift bags and lunch sacks from that stash of beloved t-shirts. Green and free, my kind of project!

Monday, January 31, 2011

Meet Hermione

This is Hermione, Madeline's first doll project. She really wanted to make a doll with her new sewing machine, but that's a little beyond her beginner's skills, so we made this a joint project. We used the super easy pattern from Make Baby Stuff, but Madeline decided she wanted an all muslin body so she could dress her in different outfits. The pattern was easy to follow, and Madeline did the stuffing and some of the larger sewing parts. I tackled the stitching of the arms and legs (they are narrow), embroidering the face and the hair. She conveniently fits into the clothes for the rag doll Madeline (of  story book fame), so she instantly had a nice wardrobe. I think I may surprise her with a nightgown for Valentine's Day, a piece that is missing from the clothes trunk. It only took us two days to complete, and she is so proud of her.  It was a great mother/daughter project - lots of creative collaboration, and no arguing! It was so speedy to put together, I'm itching to try a few on my own. There are so many variations you could add to this simple pattern!


Monday, January 3, 2011

What every woman wants for her anniversary...


sock animals! Well, a sock animal pattern book, to be exact. Okay, well maybe not every woman, but me at least. It has been such fun to make these! The beauty is how fast they come together, and that hand sewing is actually easier than using the machine. They are a great project to have in hand while catching up on Mad Men. The gray heffalump was a  joint project with my daughter, who received her first sewing machine this Christmas! She was in charge of stuffing, some sewing, and creative direction. Now I'm scouring the clearance aisles for socks and gloves (the little striped dog is from a pair of stretchy gloves I scored for 50 cents!) before they go out of season. You can find a tutorial for sock monkeys here,  although the animals from the book I used generally used a separate head. Once you get the basic idea of the construction, a whole range of friendly beasts is possible. Put a lock on those sock drawers!

Monday, November 22, 2010

Duvet Refashion


Max loves geography. He has many maps, including a laminated one that came with a wipe-off pen. Unfortunately, Max used his map on his bed and ended up with black ink marks in various places on his white duvet cover. I could not get them off for love or money. Fast forward to a great sale at Joann's where I stocked up on many yards fleece for sweat pants. The yellow bolt had extra fabric, so I bought it thinking I'd make a matching hoodie. After cutting out the pans, I had almost enough to cover Max's bed, instead. An extra strip of blue from his other pants and blam, I had a "new" duvet for about $8.  Here's what I did:

First, I cut the duvet apart at the seams. To make this a super easy transformation, I kept the side with the button holes to use as the back, and removed the buttons to recycle for the new cover.
I needed a little more length, so I added a contrasting stripe. Simply lay the second material on the first, right sides together, and stitch a seam. Since I used fleece, I didn't have to finish the edges, another big time saver. If you wanted to add an applique to the front, now would be the time to do it.

Spreading it all out on the floor, I pinned the old back to the new front, right sides together. Then I stitched  all around, leaving the top open. ( I stitched in about 8 inches on either side of the top, so there would be square corners on each end after turning.) Turn right side out.
I folded over the top of the fleece, even with the top of the backing. I added the buttons that I had removed from the original duvet.

Thirty minutes later, a new duvet! I think these robot sheets might be the perfect companion. Maybe I should let Santa know!

Monday, October 25, 2010

Halloween Decor

Holy batcave, Batman! Bats have invaded the family room! I completely stole this great idea from Dana at Made and the pattern is from Country Living (never thought you'd see that link on my blog, did ya?) They really are a show stopper. I love big bang decorations!


I am decorating on the cheap this year, so my Halloween doormat came from an extra utility rug and a can of spray paint.
I taped on some large scrapbooking chipboard letter frames as a stencil. I also taped on paper to mask the mat, leaving a frame around the outside.
Next step, paint away with spray paint.
As you may have noticed, there was some bleed through. Next time I will be more careful with the taping. But, it's free, and hopefully people will think it's dirt (it is a doormat, after all).
The sewing machine was in overdrive yesterday, as I churned out 7 pillows. One more to go and I'll post some peeks here. Now, if I were just as productive with my sketchbook...

Friday, October 15, 2010

Crunchy Granola Mom

Yes, now I am officially a crunchy granola mom, and it's a mighty tasty thing to be.  We have been making this quick but oh so good granola at least three times a week lately. It takes about 20 minutes from start to finish, and it's so easy the kids can pitch in (or even make it, depending on their age). The amounts listed here are just guidelines. I don't actually measure anything when I make it, so feel free to improvise! This can be either a gluten-free or regular granola, depending on the oats you use (please note that some Celiacs cannot tolerate gluten free oats. Fortunately, we can). If you are using regular oats, it's a very frugal granola. Even if you have to buy the pricey gluten free oats, it's still cheaper than GF granola. Amazon.com has a good price on gluten free oats, by the way.

Family Favorite Granola

2 cups oats
1/4 cup pecans
1/3 cup dried cranberries (you could also use raisins)
1/8 cup flaxseed meal (you could use whole flaxseeds, but I always have the ground flaxseeds on hand)
1/4 - 1/3 cup mixture of brown rice syrup and honey (or you could use all honey)
1 Tbs. cinnamon
1 tsp. freshly ground nutmeg

Mix everything together in a bowl. You want it to stick together but not appear wet or really moist. Spread on a silpat lined cookie sheet and bake in 350 degree oven for about 15 minutes. Let it cool. As it cools, it will stick together. Break up the cooled clumps and store in airtight jars. I really can't tell you the shelf life, because it never lasts more than two days around here.

This is really one of those recipes where you can use whatever is in the pantry. We came up with this particular combination because nobody here is allergic to pecans or cranberries, and it happens to taste great! Try it mixed with yogurt Saturday morning or over ice cream. Or do as my family does, and eat it off the cookie sheet on the counter!

Wednesday, October 13, 2010

Vacation Planner

Back to the land of the connected! My six year old modem has been on its last leg for at least a year, and while I was hoping it would hold out until Christmas, it decided to take the big digital nap on Sunday, thus delaying this promised post. My apologies.

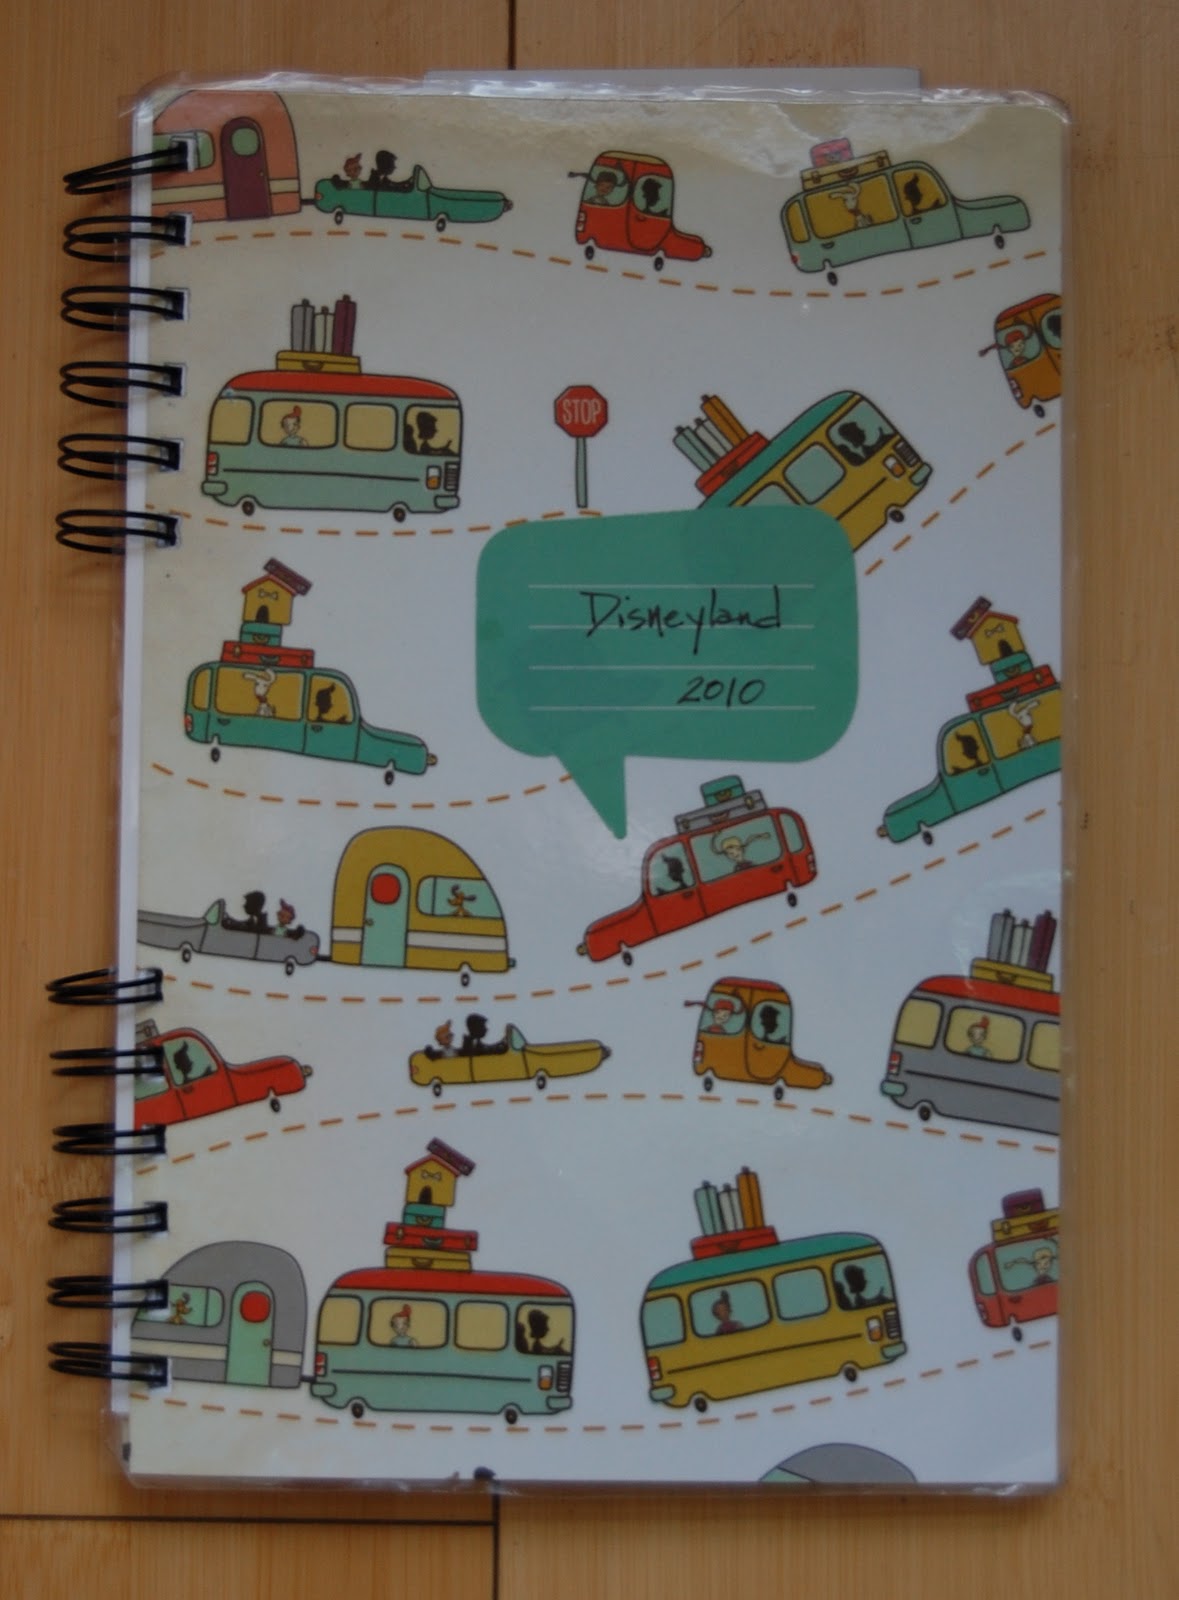
The vacation planner. While I have never been a spontaneous traveler (one very cold night sleeping in the car because all hotel rooms were booked cured me of that), by reason of necessity, I have become a skilled trip planner. You see, traveling with children who have sensory processing problems, Celiac disease, food allergies, and asthma (not to mention my own food restrictions) is no easy feat. I began planning our recent trip to Disneyland four months ago. I started by creating a travel planner. Last year I used a composition book, but it was larger than my needs required. This year, I made my own from  Cosmo Cricket scrapbook paper and my Bind It All machine (you can also have it comb bound at copy shops). I laminated the cover with my Xyron, so I could toss it in a purse or bag and not worry about it.
I also left the cover unadorned, saved for a single sticker, knowing the abuse it would face. As you can see from the bent coils, it endured a few blows.

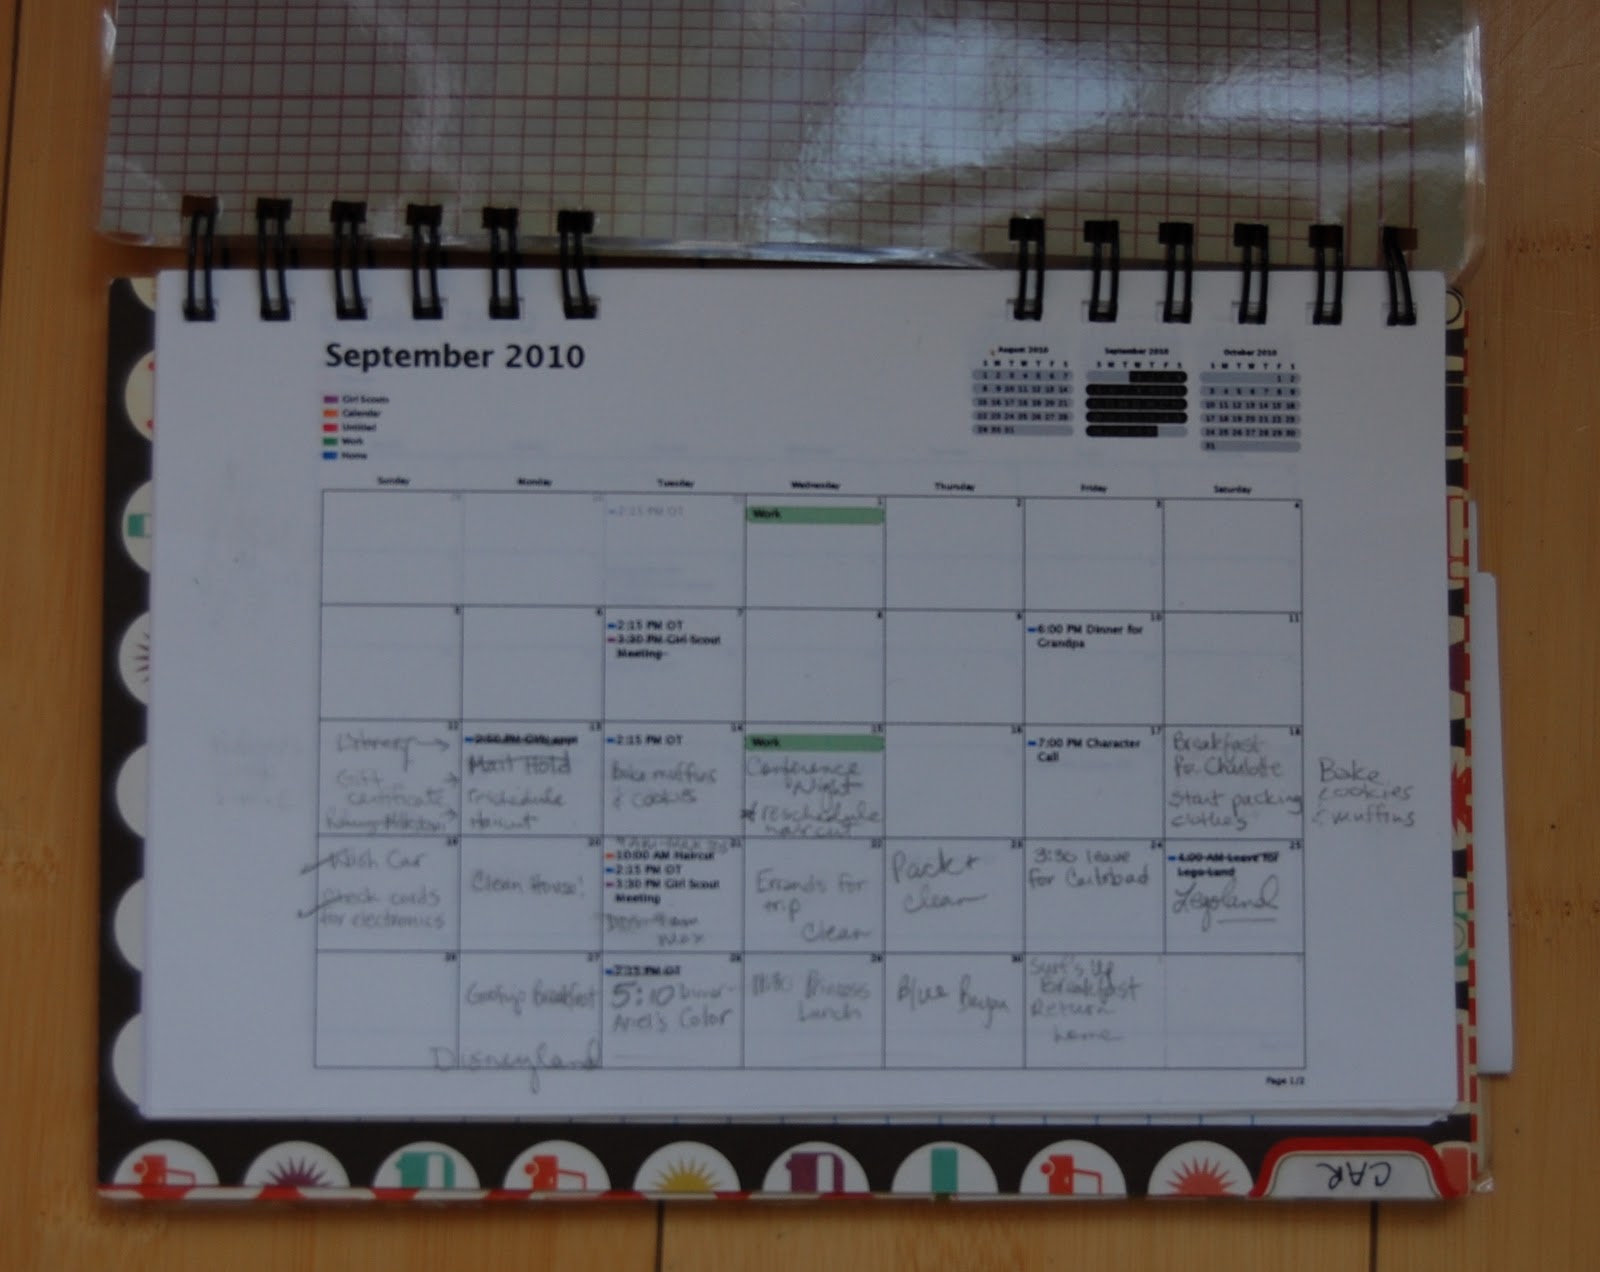
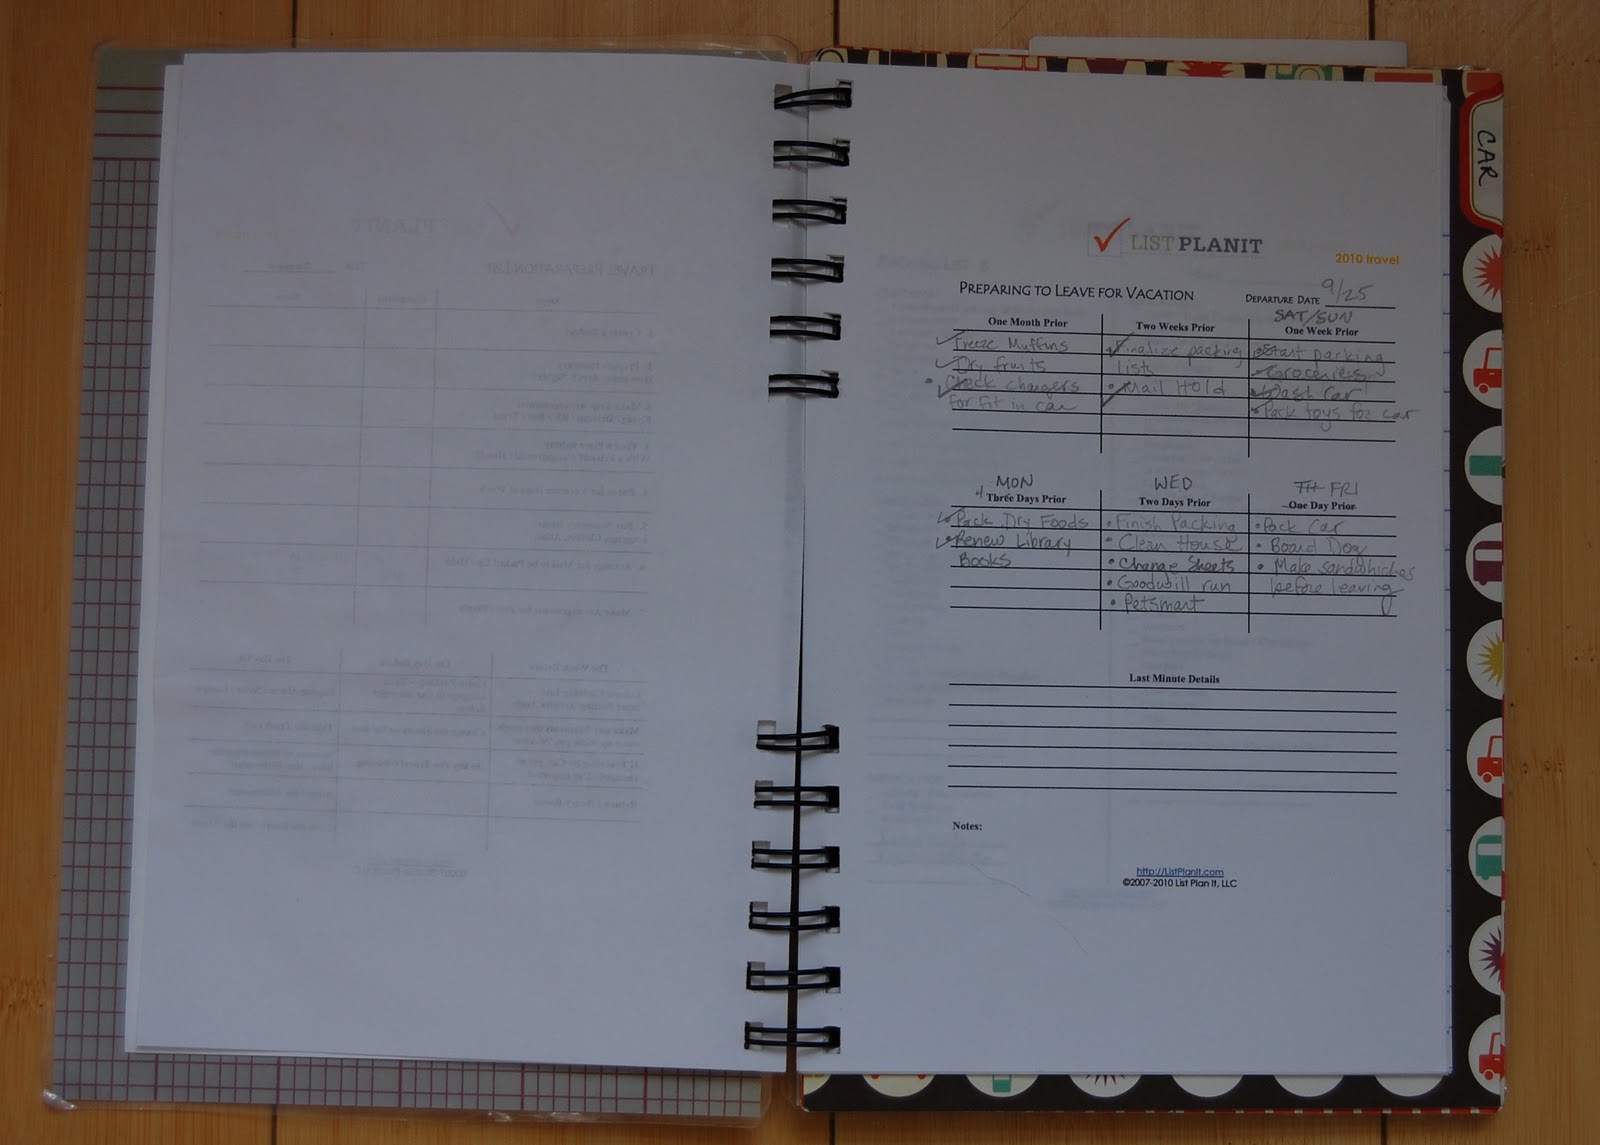
The first section is for pre-trip planning and packing. It included a calendar, pre-travel to-do's such as mail holds, plans for pets and chores.
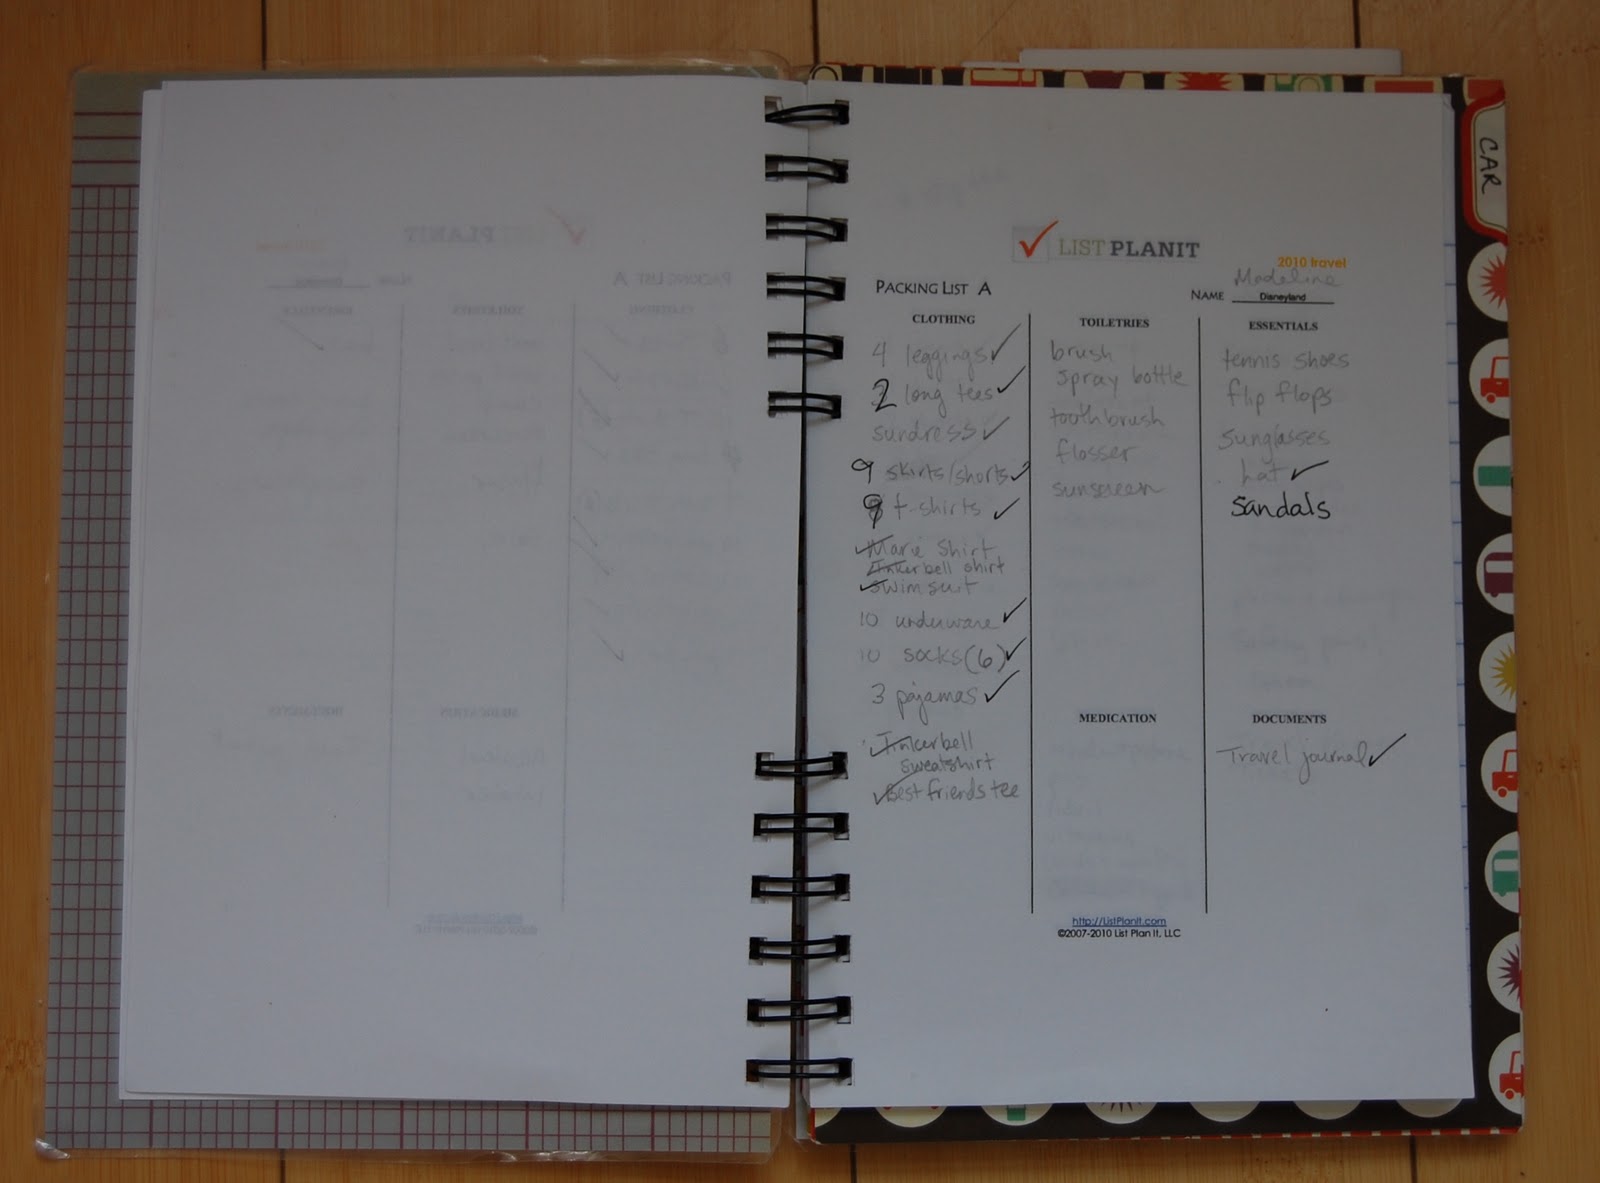
Next were packing lists for each family member. The lists are from List Planit, an online organizing site which offers a bazillion lists for all manner of topics, from work to home. I bought a download membership last year and it was worth every penny.
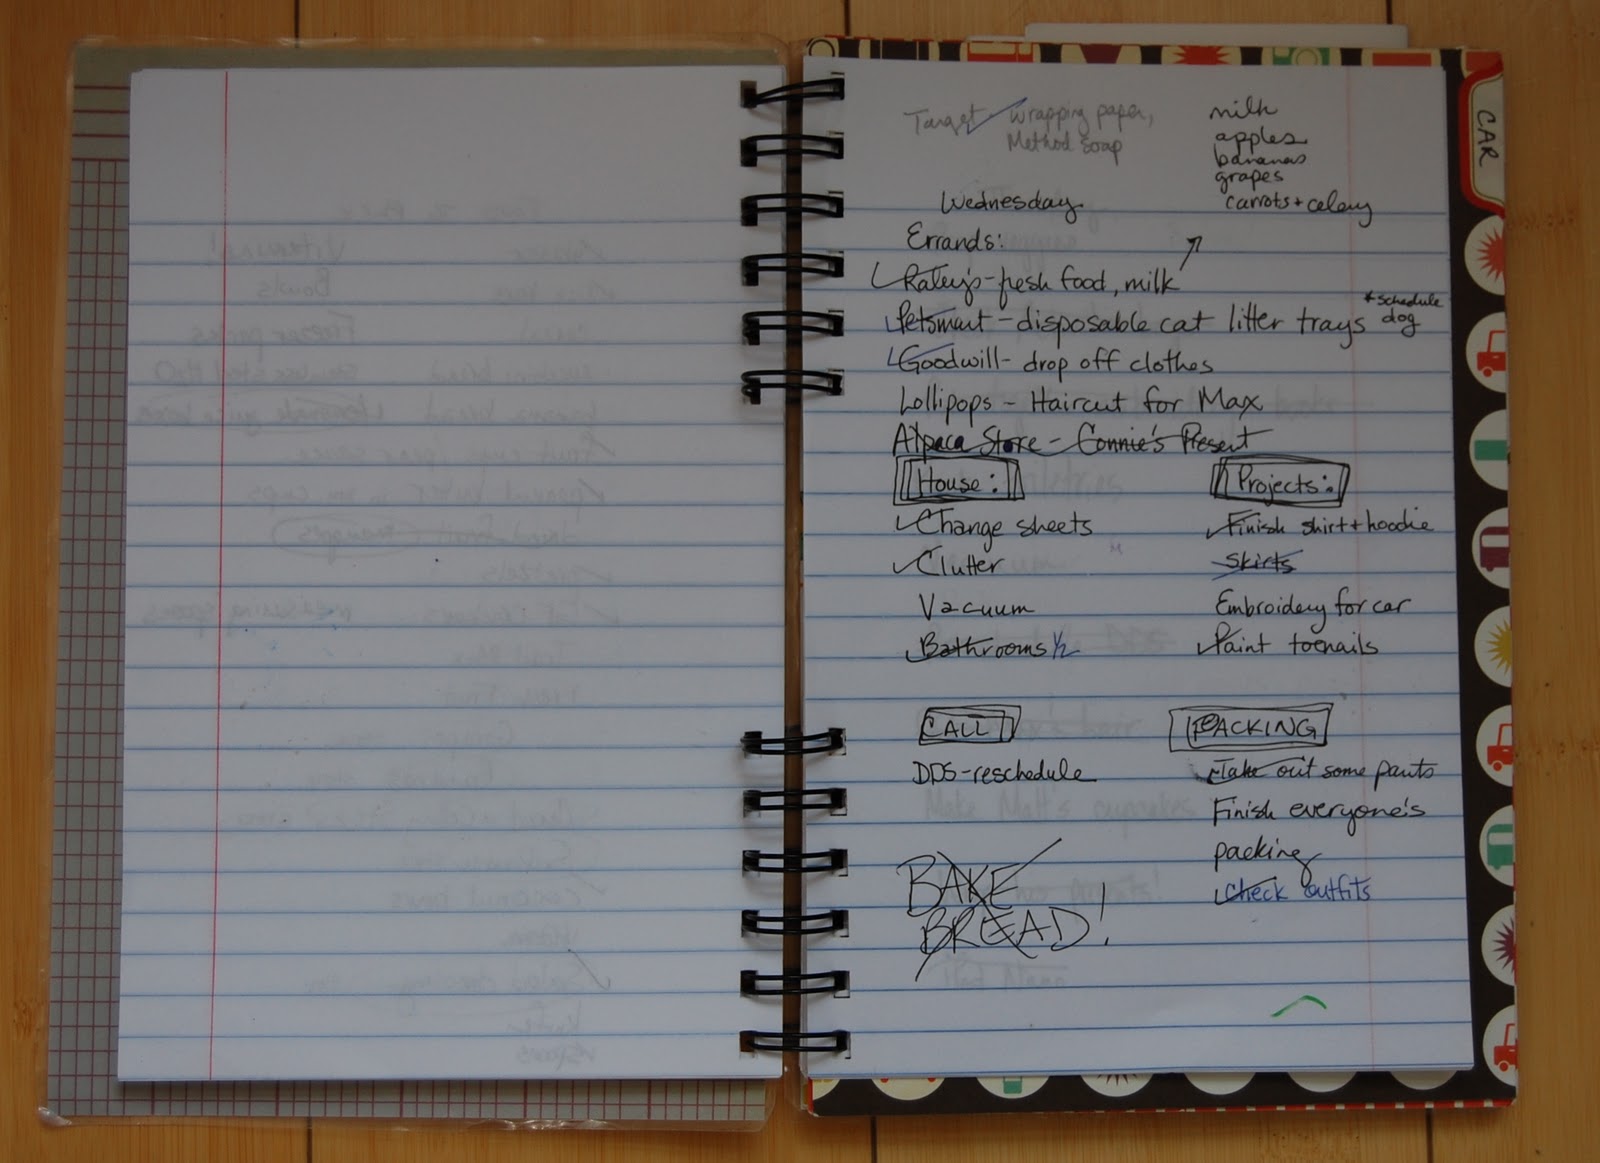
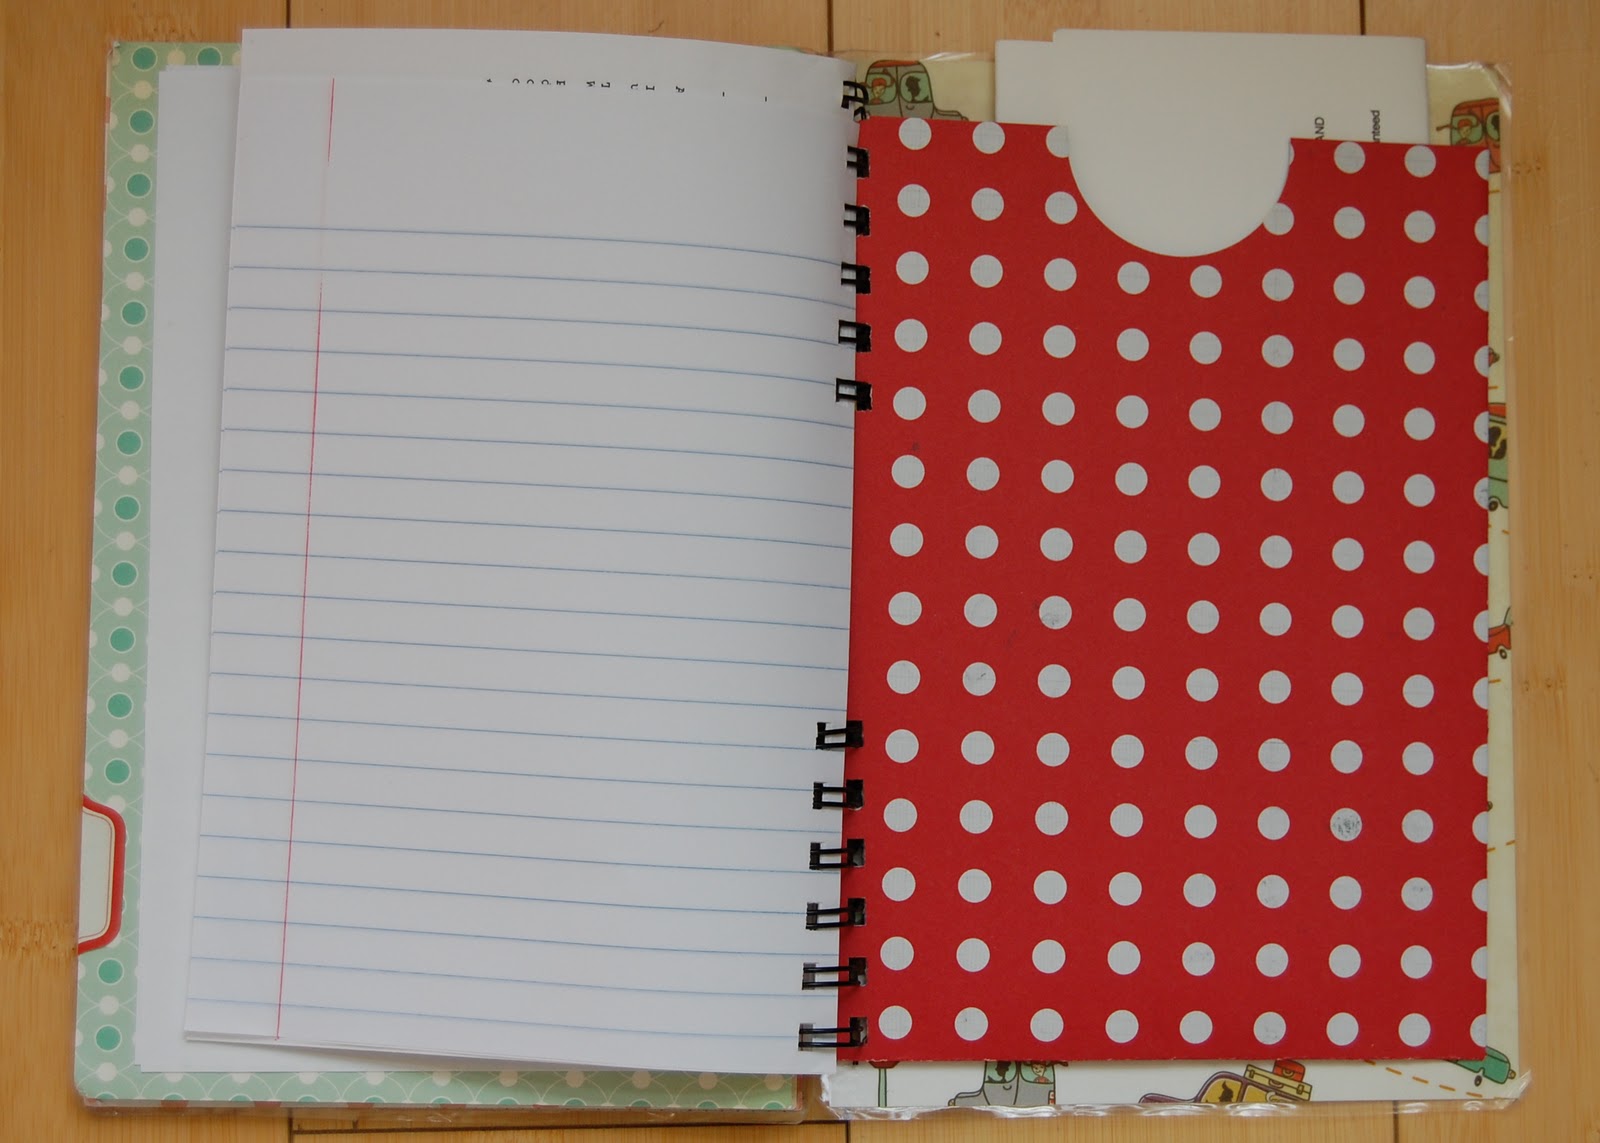
I also left lined paper in the back for food lists (we bring an extra suitcase just for food, so we always have something safe to eat), items to pack in the car, and to-do's for the days before we leave.
The next section is labeled car, and it has maps and written directions. I have a GPS on my phone, but I like to carry a back-up just in case reception is bad.
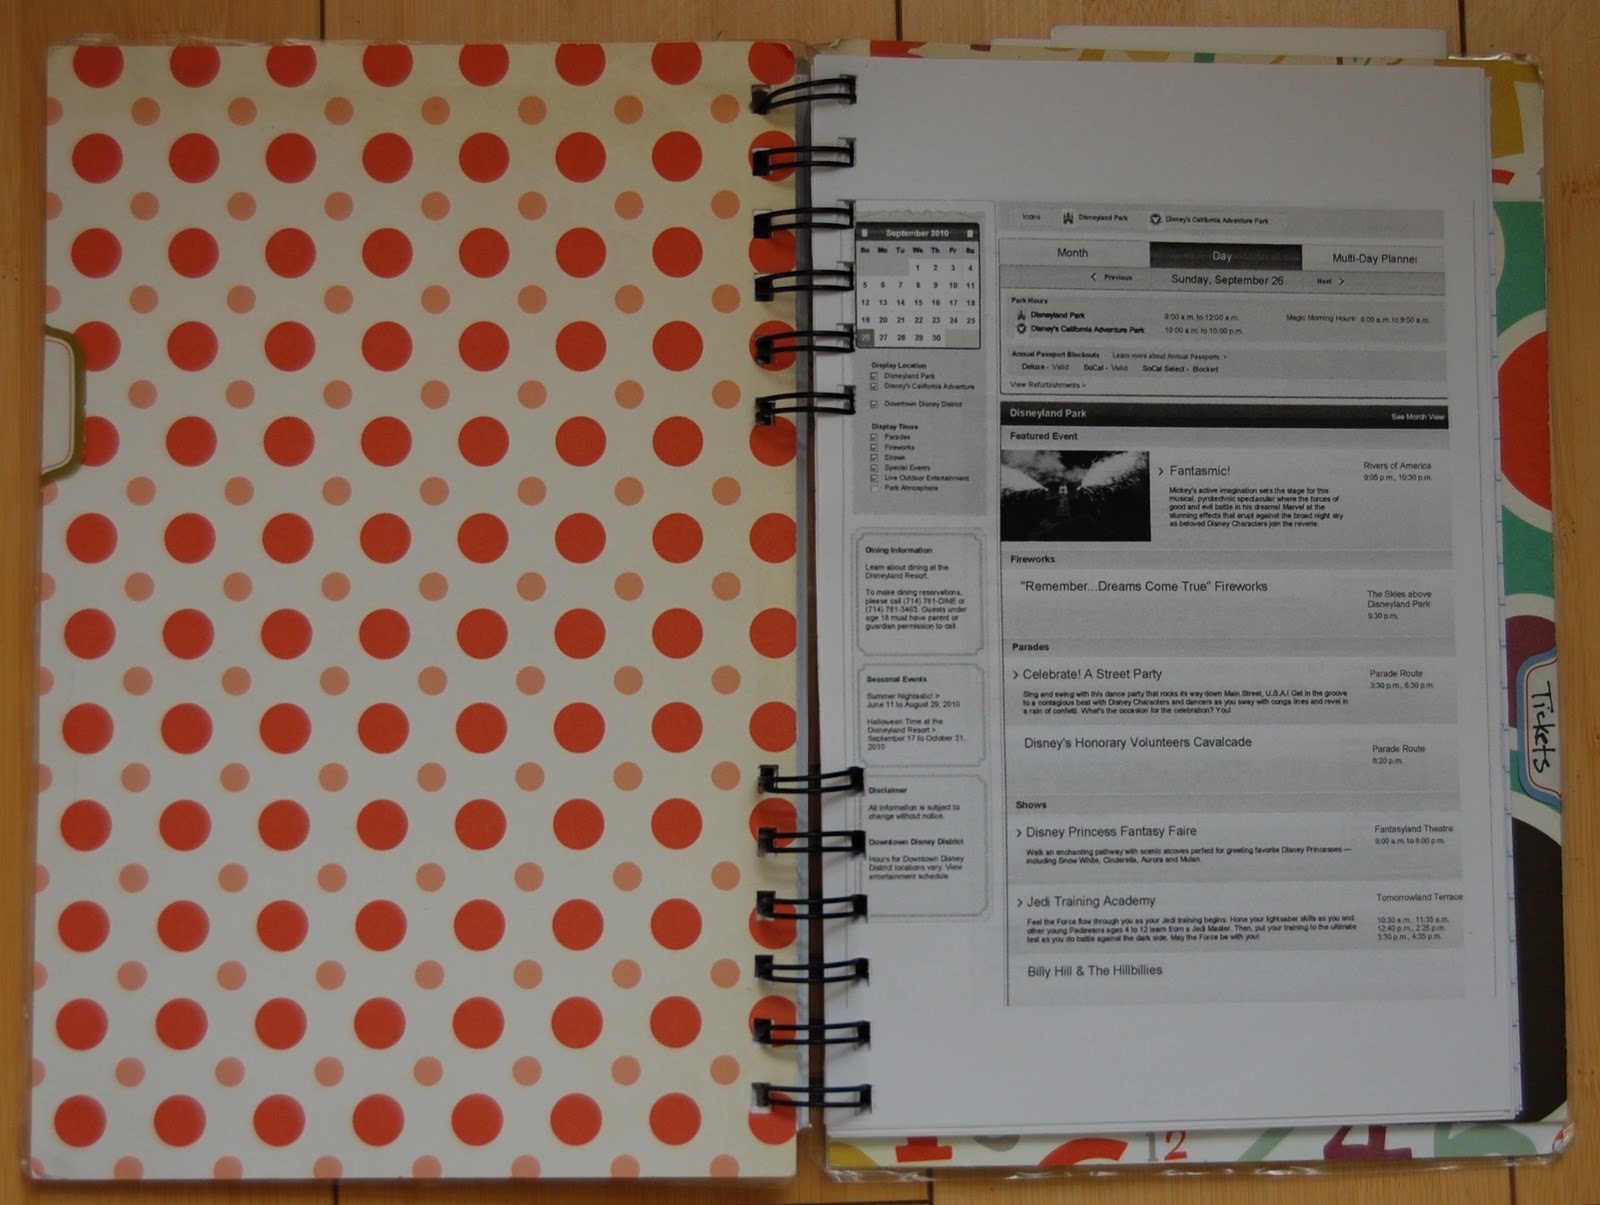
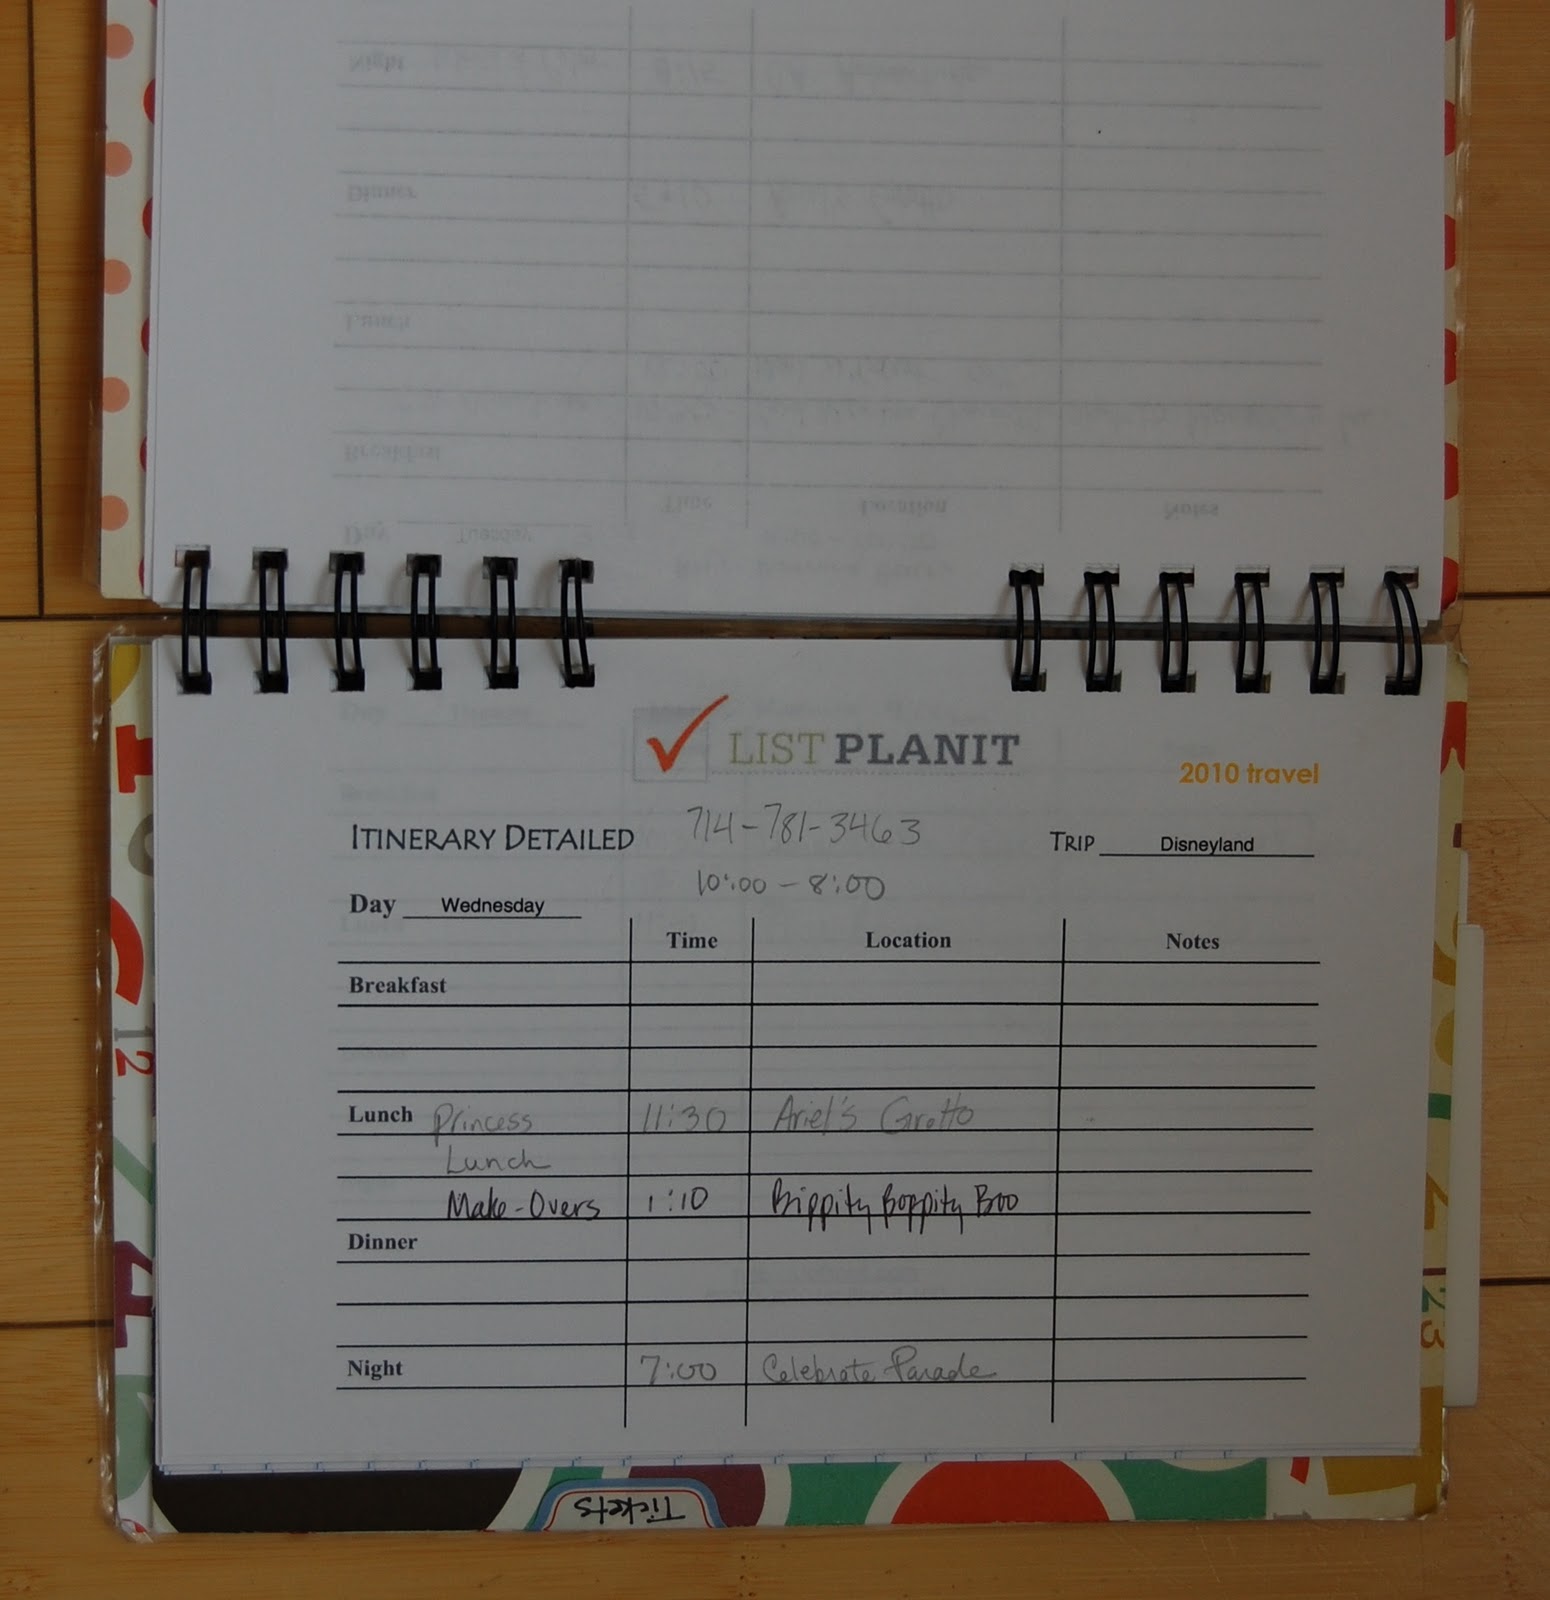
For the itinerary section, I printed the events listings from the Disney site as well as including a detailed list for each day. I make at least one meal reservation per day, and those are made far in advance and recorded here. I also like to look ahead to parade times and special events and tentatively schedule them as well, knowing that we may ditch those plans when we are actually in the park.

The last section holds hotel reservations and tickets. I included two pockets in this planner, made by simply folding tabbed scrapbooking paper and gluing it, to hold tickets and print-outs made after the book was bound.
As I mentioned before, this book gets tossed in my purse, not the luggage. All the information needed for any aspect of the trip is in one place. I also try to jot down notes in it while we are traveling or soon after we get home, about what places were safe to eat at, who had the best service, if sweaters we needed at night, what hidden gems were found, and any other useful bits for future trips. I used the notes from last year's planner to make this one, in fact.

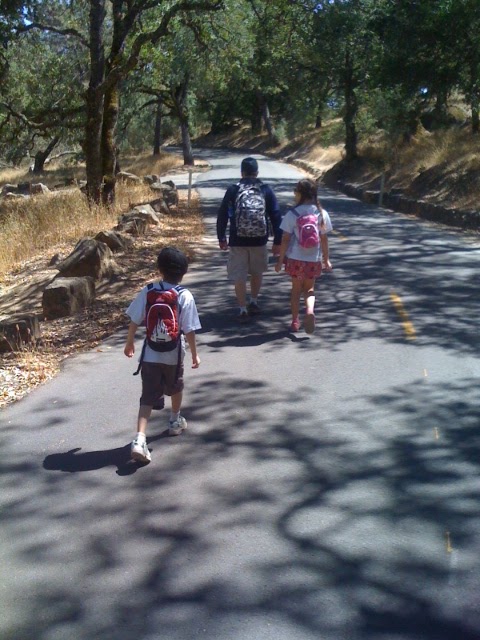
So there you have it - travel for the anal retentive. Of course not everything goes as planned (like a foot injury that put my six year old in a stroller all week - thank goodness he's small!), but it definitely runs more smoothly!